Decide who signs off on partner form submissions, what accept, decline and return each do, and what the partner sees at every step.
For partner ops and partner managers deciding how a registration, referral or request gets signed off before it counts.
Run a submission approval workflow shows you where the controls are.
This guide is the decision in front of that: how many approvers a submission really needs, who they should be, and what each outcome does to the partner on the other end.
Getting it wrong in either direction is expensive.
Too loose and unqualified deals land in your pipeline with a partner already told yes.
Too tight and partners wait days for an answer, which is the fastest way to teach them not to register the next one.
An approval model you can defend: the right number of steps, the right approver on each one, outcome messages that tell a partner what to do next, and a clear view of what this model can and cannot express, so you find out here rather than three weeks into a rollout.
Approval is a business decision before it is a setting.
Write down who is accountable for saying yes to this form: a named person, whoever manages that partner, or anyone on the team.
That answer maps directly onto the options below.
2
Have partner ownership wired, if you plan to route by it
Two of the four approver options resolve per partner rather than to a fixed person, and both need ownership set on the partner record.
See Wire partner ownership and Set up partner team roles.
A submission with no gate is accepted the moment it arrives, and its CRM automations run immediately.
That is the right answer more often than teams expect: a referral you would never turn down, an event registration, a support request.
Add a gate only where a wrong yes costs you something, because every gate you add is latency a partner feels.On the form’s Automation tab, Approval gate under Review is what holds submissions as Pending instead.
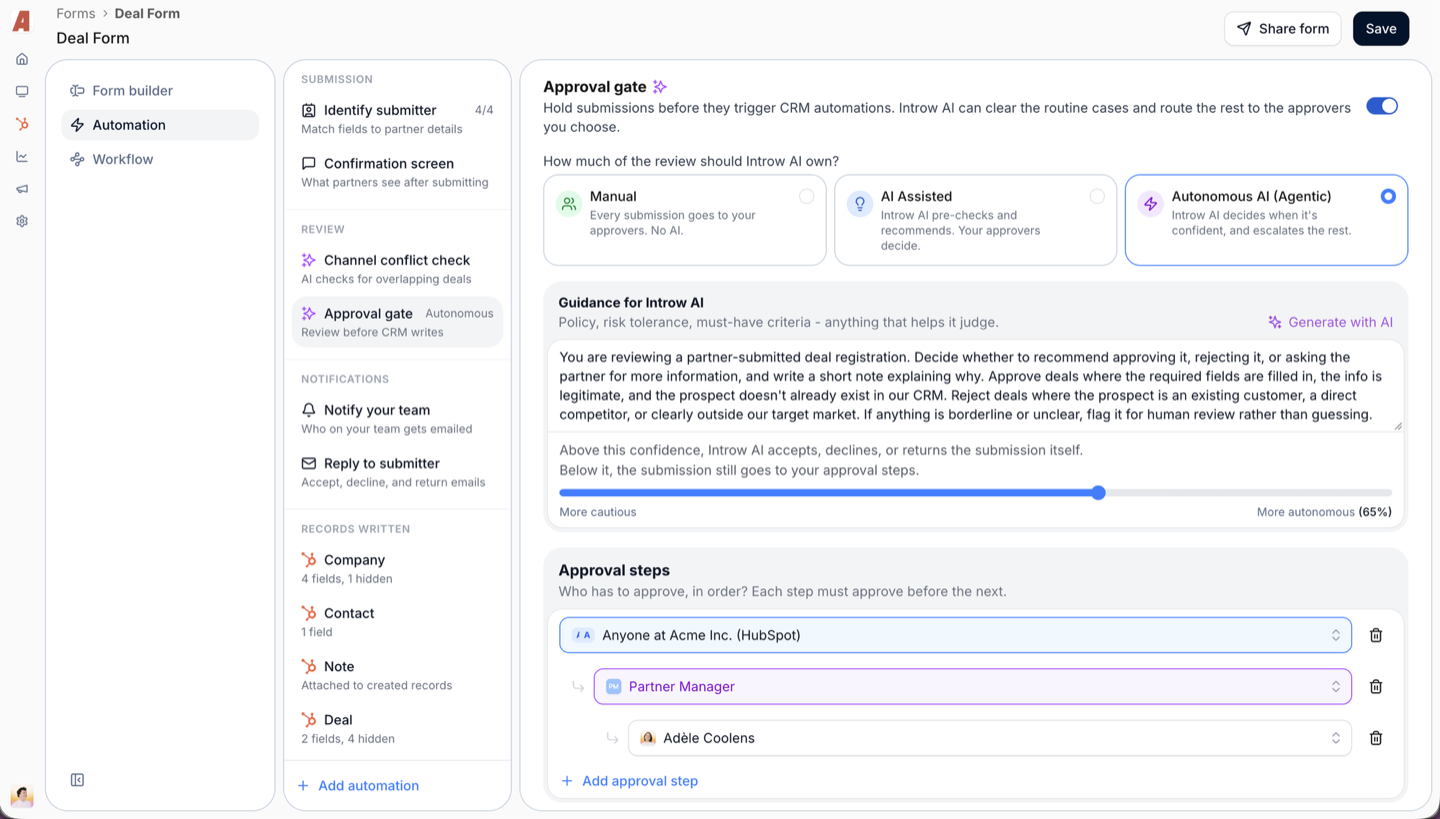
Switching it on lands the review on AI Assisted and seeds a first step set to Anyone, so the gate starts permissive and you tighten it from there.
2
Pick the approver for each step
Steps run in order, and each step carries exactly one approver. Your options:
Anyone - any team member in your organisation can approve. Use it when speed matters more than who signs, and for the first step of a queue your ops team works together.
A specific team member - one named person. Precise, and the only option that stalls when they are on holiday, so keep it for genuinely personal sign-off.
A partner team role - resolves per partner to whoever holds that role on the submitting partner. This is how one form serves a hundred partners without a hundred rules.
Fund owner - on MDF forms only, resolves to the owners of the fund the request is routed to. See Set up an MDF program.
The two dynamic options are what make a gate scale.
A step set to a partner team role reads as “the person responsible for this partner” rather than a name, so onboarding a new partner manager changes nothing about the form.
3
Add a second step only for a genuinely different judgment
A second step is worth its latency when the second approver is deciding something the first cannot: a discount beyond policy, a fund commitment, a strategic account.
It is not worth it when the second approver is just double-checking the first.
Chain the steps in the order the decision actually travels, since each one must approve before the next is asked.Removing the last step switches the gate off entirely, which is the quickest way back to auto-acceptance.
4
Let AI take the routine volume
On a high-volume, rule-based form, most submissions are decided by criteria you can write down.
One question on the gate sets how much of that Introw AI owns: Manual, AI Assisted while you learn what its verdicts look like, then Autonomous AI (Agentic) once they hold up.
Describe the policy under Guidance for Introw AI in plain language, or generate a first draft from the form’s own fields and edit it.
On Autonomous AI it accepts, declines or returns on its own only above the confidence you set, and everything below it still reaches a human.
One question decides how much of the review Introw AI owns; the guidance and the confidence bar under it are what it is held to.
This is the one lever that shortens the queue without loosening the rules, and it is why a two-step gate is survivable at volume.
See AI approvals.
Every submission sits in exactly one state, and the state decides what can still happen to it.
Status
What it means
Can it still be edited?
Pending
Waiting on an approver step, or on AI that was not confident enough
Yes
Accepted
Approved. CRM automations have run and the partner has been told
No
Auto accepted
Accepted without a human, either with no gate or by AI above its threshold
No
Declined
Rejected, with your decline message sent
No, but it can be reopened
Returned
Sent back to the partner for more information
Yes, by the partner
Error
Something failed on the way to your CRM, usually a validation rule
Yes
An Error is not a decision.
It means the submission could not be written, so treat it as work rather than an outcome: fix the value it tripped on and resubmit.
2
Choose between decline and return deliberately
They read very differently to a partner, and only one of them is reversible on your side.
Decline ends it with your decline message. If circumstances change, Reopen at the top of a declined submission sends it back to Pending, where it re-enters the gate from the first step and AI validation runs again.
Return keeps it alive and hands it back. Use it whenever the answer is “not like this” rather than “no”.
Return is per submission by design, because it asks one partner for something specific.
A bulk decision can only accept or decline.
3
Write the outcome messages once
Set the Accept and Decline messages on the form so every partner gets a reason rather than a status change, and edit them per submission when a case deserves it.
A decline that explains what would have qualified is the difference between a partner registering again and a partner giving up.
4
Treat accept as final
An accepted submission cannot be un-accepted, because accepting is what created the record in your CRM and told the partner yes.
If you accept one in error, correct the record in your CRM and use Return to ask the partner for a corrected submission.
On forms where a wrong yes is costly, that is the argument for a gate rather than for an undo.
Partners chase you for status because nothing shows it to them.
Add the Form submissions section to the portal experience from the Forms group in the section picker.
It lists that partner’s own submissions with a Status column, so “where is my registration” answers itself.
See Every section you can add to a portal.
2
Understand what a returned submission looks like to them
A partner who reopens the form finds their previous answers already filled in and your reviewer’s return comment shown alongside them, and their edit resubmits the same submission rather than creating a second one.
That is why Return does not fragment your inbox, and why a returned submission is worth a specific comment: the comment is the instruction they act on.
3
Confirm the outcome emails have recipients
Outcome emails are org-level, not per-form.
On Default settings, open the Notifications tab and give Form submission accepted, Form submission declined and Form submission returned their recipients under the Submissions group.
See Control who gets notified.
Submit a test through the form and follow it end to end.
It should arrive as Pending (or Auto accepted if AI cleared it), name the approver you expect on its current step, and change status as each step signs off.
Decline it and confirm the partner receives your decline message and that Reopen puts it back to Pending.
Return a second test and confirm the partner’s form comes back prefilled with the return comment attached.
See Test a form before partners see it.