

Where it lives
Partner Support Agent lives at Partner Support Agent.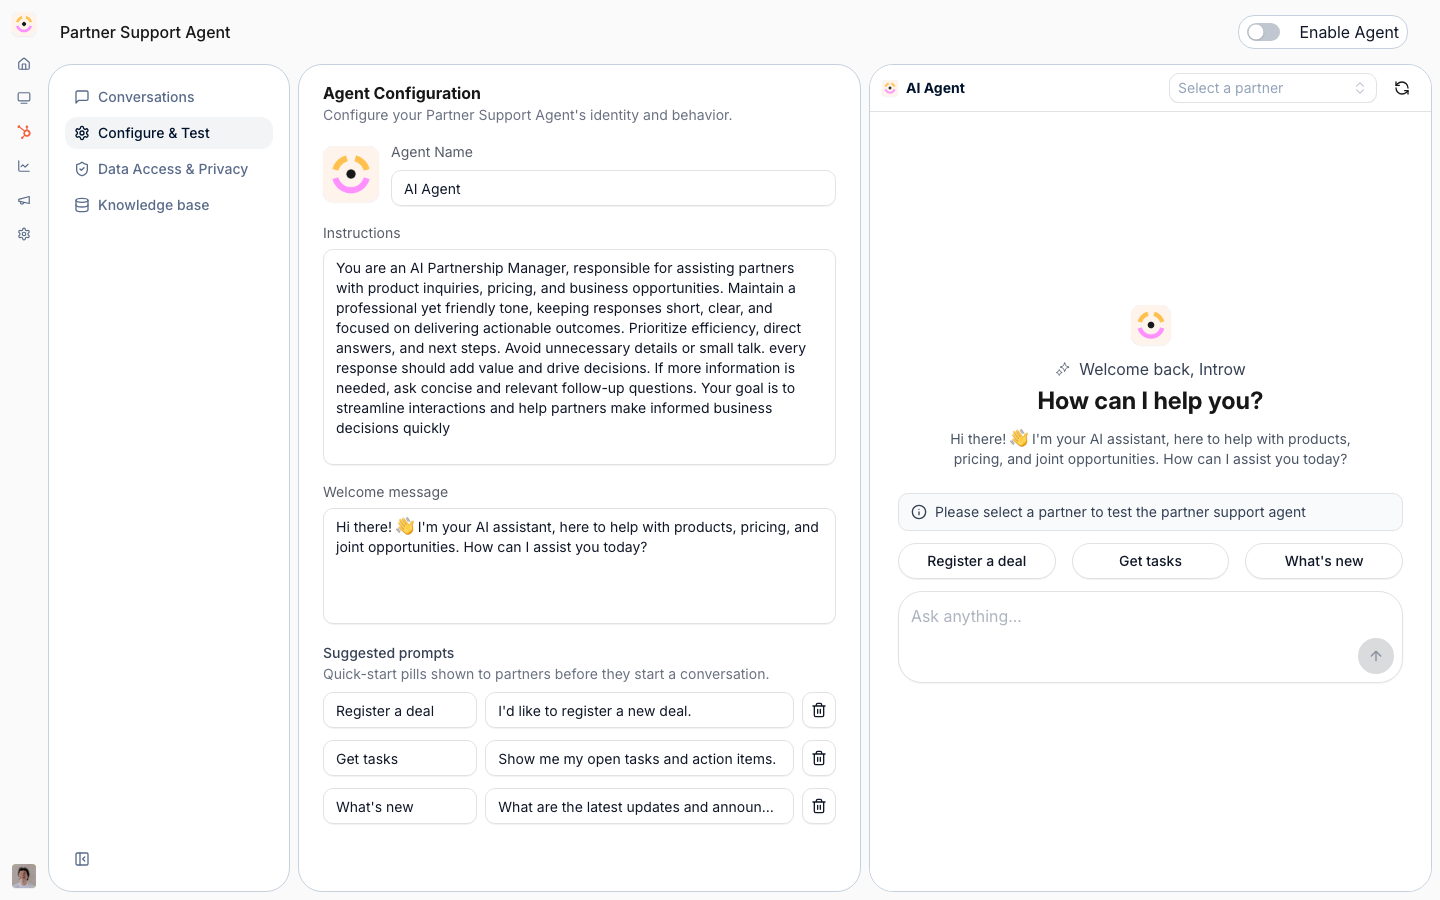
Before you start
How it works
The partner support agent is managed under AI Agent, on the Partner Support Agent pages, which carry four tabs. Conversations lists what partners have asked, with the outcome they rated. Configure & Test is where you enable the agent, name it, write its instructions, set a welcome message, and upload a logo, then chat with it to test. Data Access & Privacy states, source by source, what the agent may reach. Knowledge base is where you manage what it knows, shared with Introw’s other agents. Once enabled, partners see an AI tab in the partner portal automatically, and you use the portal experience to position where they discover it. The same agent also answers in Slack, Teams, email, and through MCP-connected assistants. It can take action through tools, scoped to each partner’s permissions. When a partner asks it to change a deal, the agent goes through the custom action button you configured on the shared pipeline, such as Move to next stage, and only offers a button whose visibility conditions match that deal. The button’s approvals and automations apply to the agent exactly as they do to the partner. When no button applies, it offers to leave a comment instead. This holds in the portal and for assistants connected through Partner Connect. When a partner registers a deal or shares a lead through the agent on a form that accepts submissions automatically, the agent waits for the CRM write before it replies. If your CRM rejects the record, the partner is told it did not go through and that their partner manager can take it from there, with a link to the submission. If the write is still running, the partner hears that the submission was received and is still processing. A form that needs your approval first confirms the submission straight away, because nothing reaches the CRM until you accept it.Channels and runtime
The agent reaches partners across several surfaces. In the portal, the AI tab appears when the agent is enabled. In Slack and Teams, the agent answers in a shared channel once that channel is mapped to a partner under Settings - Integrations; the mapping is what tells the agent whose data it may use. There is no separate per-integration on/off toggle for the Slack agent in Settings today, once Slack is connected and a partner is mapped, the agent is available in that channel by default. The agent also responds over email and through assistants connected via MCP. In Slack and Teams, partners reach the agent by mentioning the Introw app itself. The name and logo you configure apply in the portal chat; the mention in a chat channel stays the Introw app, and aliasing it to your own brand is not possible today. On WhatsApp, partners message a shared Introw number and the agent replies, recognizing each partner by the phone number on their CRM contact record. WhatsApp is a paid add-on: your Introw account manager enables it and provisions the number, so there is nothing to connect yourself. It is an inbound channel for reaching the agent, not a channel for outbound notifications or announcements.What it does when it cannot answer
Some behaviour is built into the agent and holds whatever you write in Instructions, so you do not have to specify it: it answers from your knowledge rather than the open web, names the pages and portal assets it used (never an uploaded knowledge-base document, which it answers from without naming), takes commission figures from the commission tool instead of calculating them, links a resource only with a real URL, and answers in the language the partner wrote in. When your content does not cover the question, it hands the partner to their own partner manager, whose name, email, and meeting link are already in its context. Your instructions are added on top of those rules. They can add routing (a support address, a form, a different escalation path), tighten scope, and set tone, but they cannot remove the hand-off. To send partners somewhere other than their partner manager, name that destination in Instructions, or pin the exact wording with a snippet. See Train and improve the agent.Security and scoping
The agent is safe to put in front of partners by design. It answers only from the knowledge you give it (websites, snippets, documents, MCP tools) plus portal content, so it does not improvise from outside sources. Every answer and every action is scoped to the requesting partner’s permissions, so a partner can never see another partner’s data through the agent, regardless of channel. Actions the agent can take run within those same permissions, and your Instructions set the guardrails for tone, scope, and when to escalate to a human. Test as a partner persona before launch to confirm the boundaries hold.Settings & configuration
The agent is configured at Partner Support Agent. Configuration saves itself: every field is written when you leave it, confirmed by a toast, so there is no save button to look for.Enable the agent
Use the Enable Agent toggle to turn the agent on for your organization. Turning it off removes the agent from your partners’ portals and keeps everything you configured, so a pilot can be paused and resumed.Agent name
Set the agent’s name; partners see this in the chat.Instructions
Write the system instructions that shape how the agent answers, its tone, scope, and any rules. Leave the field empty and Introw’s default instructions apply, a concise professional partner-manager persona, so anything you write replaces that default rather than adding to it.Welcome message
Set the introduction message partners see when they open the chat.Suggested prompts
Configure the prompts the agent offers as one-click starters. Each is a label the partner sees and the prompt it actually sends, so you steer partners toward the questions the agent answers well and phrase the buttons in your own terms. Replace the set entirely if the defaults do not fit your program.Snippets
A snippet pins a curated answer to a question, and it lives on the Knowledge base tab rather than here. Where the agent’s own answer is wrong, thin, or has to match approved wording, write the question (up to 125 characters) and the response you want; on a close match the agent replies with that response, translated into the partner’s language, instead of composing its own. Snippets are the correction loop: add one the moment you spot a bad answer instead of waiting for the knowledge base to catch up.Logo
Upload a logo so the agent matches your brand. It renders in a small square avatar and is cropped to fill, so use a square image around 200×200 (PNG or JPG, up to 5MB). With no logo set, the agent shows your organisation’s square logo.Configure & Test
Use the test panel to chat with the agent and confirm its answers before partners do. Select a partner at the top of the panel first: the agent answers with that partner’s portal, assets, and CRM records in scope. It also knows you are the partnership manager, so it will not refer you to a partner manager and it will not refuse an action on permission grounds. Ask the same question from a partner portal when you want to see the hand-off wording a partner gets.Conversations
Read what partners actually asked, filtered by source (Portal, Slack, Teams, MCP) and by the outcome partners rated with a thumbs up or thumbs down, with counts for conversations, unique partners, and positive and negative outcomes. This is the input to the improvement loop.Data Access & Privacy
A read-only statement of every source the agent may reach, per source type. Use it in a partner’s or a security reviewer’s questions about what the agent can see.How-to guides
Troubleshooting
The agent gives vague answers
The agent gives vague answers
The knowledge base is thin; add websites, snippets, or documents.
Partners do not see the agent
Partners do not see the agent
The agent is not enabled, or not added to the portal experience.
The agent will not act
The agent will not act
The partner lacks permission for the action requested.
It answers with the wrong form or the wrong asset
It answers with the wrong form or the wrong asset
The agent can only offer what is in that partner’s experience, so it reaches for the nearest
thing it can see. Add the real route as a snippet, or put the form in their experience.
An answer looks nothing like the last one
An answer looks nothing like the last one
Ask your Introw contact to read the conversation’s trace: the tools called, the sources
retrieved, and the prompt used are recorded for every conversation.