

What you’ll achieve
A payout batch taken end to end: per-partner payouts built from earned lines, statements produced for partners’ records, exceptions declined or postponed, and each payout advanced to Paid, so the partner sees their commission as paid in the portal and your finance records reconcile.Before you start
1
Confirm access
You need write access to payouts.
2
Review the lines first
A line is batched as soon as it is earned, shown as Expected; there is no separate approval on a line. Decline or postpone what should not pay before you batch, or from inside the batch.
3
Set commission billing info
Your commission billing info should be set so statements are complete.
Steps
Phase 1 - Create the payout batch
1
Open payouts
Go to Payouts. The list groups batches into All, Upcoming, Paid, and Declined so you can see what is in flight versus settled.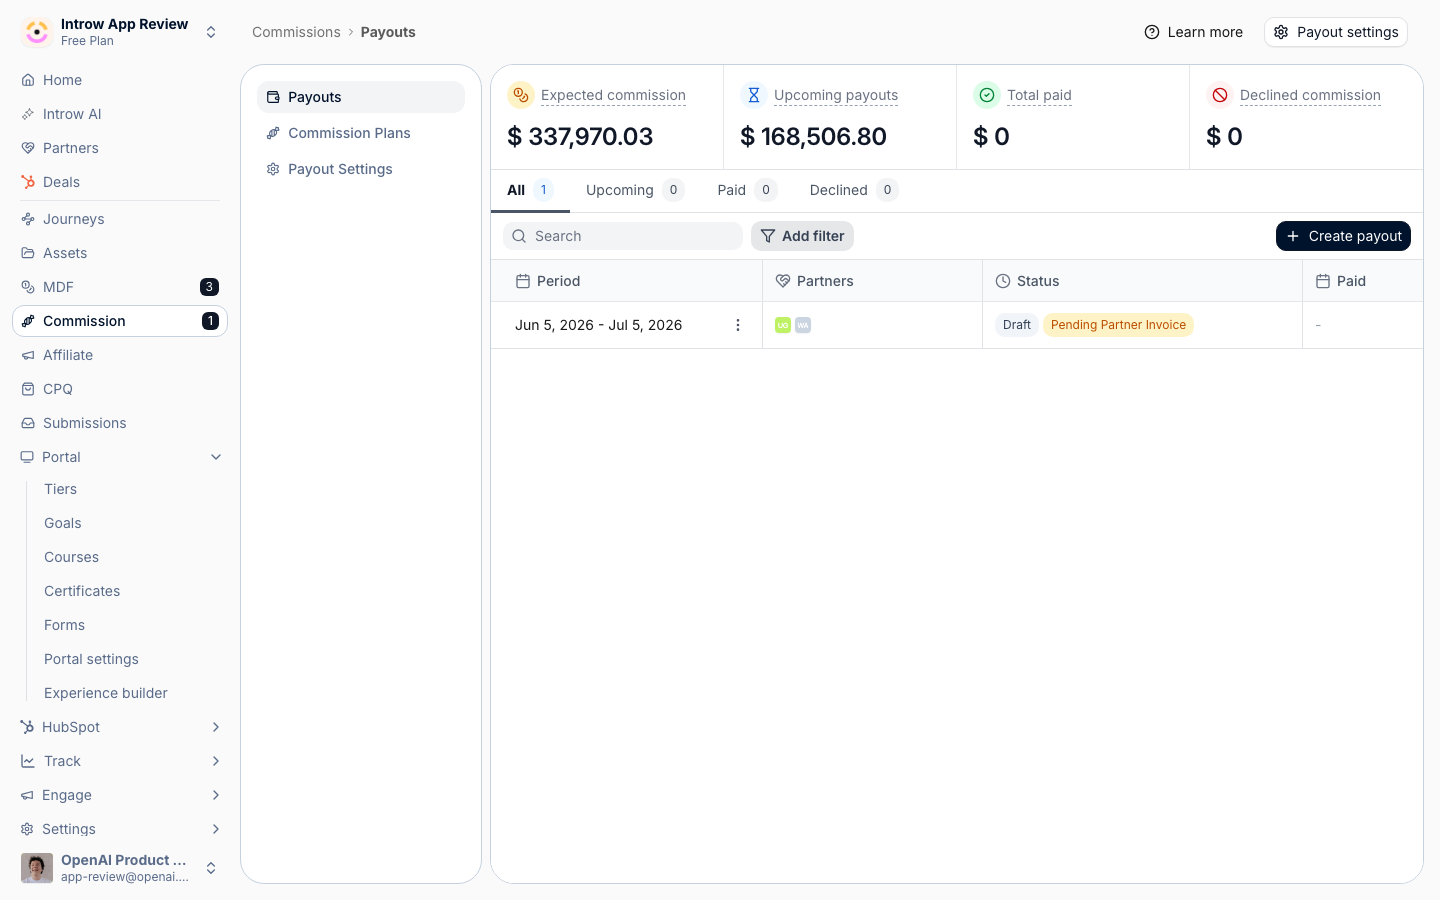
2
Create a new payout
Choose Create payout to open the Create new payout dialog, then define the run:
- Select period - the date range the batch covers. Earned lines not yet on a payout whose date falls in this period are eligible, plus any earned backlog from before it, so set it to the cycle you are paying (for example last month or last quarter). The dialog proposes the period your payout schedule implies.
- Partner scope - leave the default All partners to include everyone with eligible commission, or apply a segment filter to pay a specific group. The table previews each partner and their commission total.
- Selection - tick the partners to include; the footer shows how many are selected and the running Total.
Phase 2 - Move payouts through their stages
1
Understand the stage ladder
Open the batch to see each partner’s payout and its stage. The typical path is Draft, Pending Partner Invoice, Pending payment, Paid; teams that add an internal gate use Pending approval and Approved before sending, and Scheduled appears while funds are about to land. Exceptions show as Declined, Postponed, Blocked, or Failed. Partners see nothing while a payout is in Draft. From the first stage after it, including Pending approval and Approved, the partner can see the payout. The stage tells you what each payout is waiting on; you advance it as the real-world steps complete, or Introw Pay advances it for you.
2
Generate statements and request invoices
Produce the documentation partners and finance need. Use Request partner invoice on a payout (or in bulk) to generate a commission statement, move the payout to Pending Partner Invoice, and email the partner to upload their invoice. You can also produce the statement and Send to partner directly, or Download and Regenerate it from the partner panel. Statements use your commission billing info, so they double as the partner’s earnings breakdown.
3
Handle exceptions in the batch
Clean up anything that should not pay in this run. From a partner’s payout panel you can Decline a line with a reason, Restore one declined in error, or Postpone to next cycle to hold a valid line back without voiding it (then Unpostpone when it is ready). Whole partner payouts can likewise be declined, postponed, and restored. This keeps the batch paying only what should be paid now.
Phase 3 - Pay, and mark payouts paid
1
Pay with Introw Pay
If your payout method is Introw Pay, choose Pay now on the batch. Introw Pay issues one invoice to your company for every ready partner; when you pay it, each partner is paid in their own currency and their payout advances to Paid on its own. Partners who have not finished their payout setup stay in the batch for the next run. The full run is in Pay a payout cycle with Introw Pay; skip the remaining steps in this phase.
2
Record payment details
As you settle each payout, record the supporting detail. Enter the PO number where your finance process needs one, and make sure any requested partner invoice has been received and attached.
3
Mark as paid
Once your finance team has paid a partner, advance the payout to its final stage with Mark as paid, or let your ERP do it through the API. The payout reads Paid, and the partner sees it as paid in the portal. If you ever need to reverse a mistake, Mark as unpaid returns it for correction.
Scheduled batches
If you set a non-manual Payout schedule in settings (every month, every quarter, or every fiscal quarter), Introw creates the payout batches for you when each period closes, applying your minimum payout amount, rather than you starting each one. You still review, document, and pay each batch using the same stages above. See Configure commission and payout settings to set the cadence.Verify it worked
The batch shows its per-partner payouts at Paid, the batch moves into the Paid tab, and the Total paid figure on the commission dashboard reflects the run. Each partner sees their payout marked paid in the portal with a statement available, and your finance records reconcile to the documented amounts and PO numbers.Related
Pay a payout cycle with Introw Pay
Settle the whole batch with one invoice.
Request a partner invoice
Collect an invoice before you pay, the invoice-first variant.
Review and adjust commission lines
Approve and clean lines before batching.
Configure commission and payout settings
Set the schedule, minimum, and billing info.
Implementation reference
Full configuration options.