

For partner ops or a CRM admin turning partner submissions into clean, attributed CRM records.A form only pays off when its data lands in the CRM correctly, with no re-keying and no duplicates. This guide wires a form to your CRM end to end: map each field to a property, decide whether a submission creates or updates records and how it fills each property, tie every record back to the submitting partner, and prefill known data so partners confirm instead of retype. It works with HubSpot and Salesforce, with the CRM-specific differences called out where they matter.
What you’ll achieve
A form whose submissions write straight into your CRM the way you intend - creating or updating the right objects, filling properties without clobbering good data, attributed to the correct partner, and prefilled from a known record when the form is opened in context. Partner-attached pipeline and reporting stay accurate without manual cleanup.Before you start
1
Connect your CRM
A CRM integration (HubSpot or Salesforce) must be connected and synced. Without it, the mapping controls do not appear.
2
Have a form with fields
The form should already have its fields (see Build and publish a form).
3
Know your target objects
Decide which CRM objects each submission should affect and which properties matter, so you map deliberately.
Watch it
- Video
- Click through
Steps
Map fields to CRM properties
1
Map each field to an object and property
Go to Forms, open the form on the Form builder tab, and select a field. In its CRM Mapping section, choose the CRM object the field belongs to and the property its value should write to. A mapped field carries the property’s name and type, so the submitted value goes to exactly the right place. Map every field whose answer belongs in the CRM; leave purely informational fields unmapped.
Configure what each submission writes
1
Add a CRM object automation
Open the Automation tab. The column beside the form lists everything a submission does, in four groups: Submission, Review, Notifications and Records written. Every CRM record the form writes is an entry under Records written, such as Company, Contact and Deal, with a count of the fields it maps. Choose Add automation at the bottom to add one for another object, and select an entry to open it.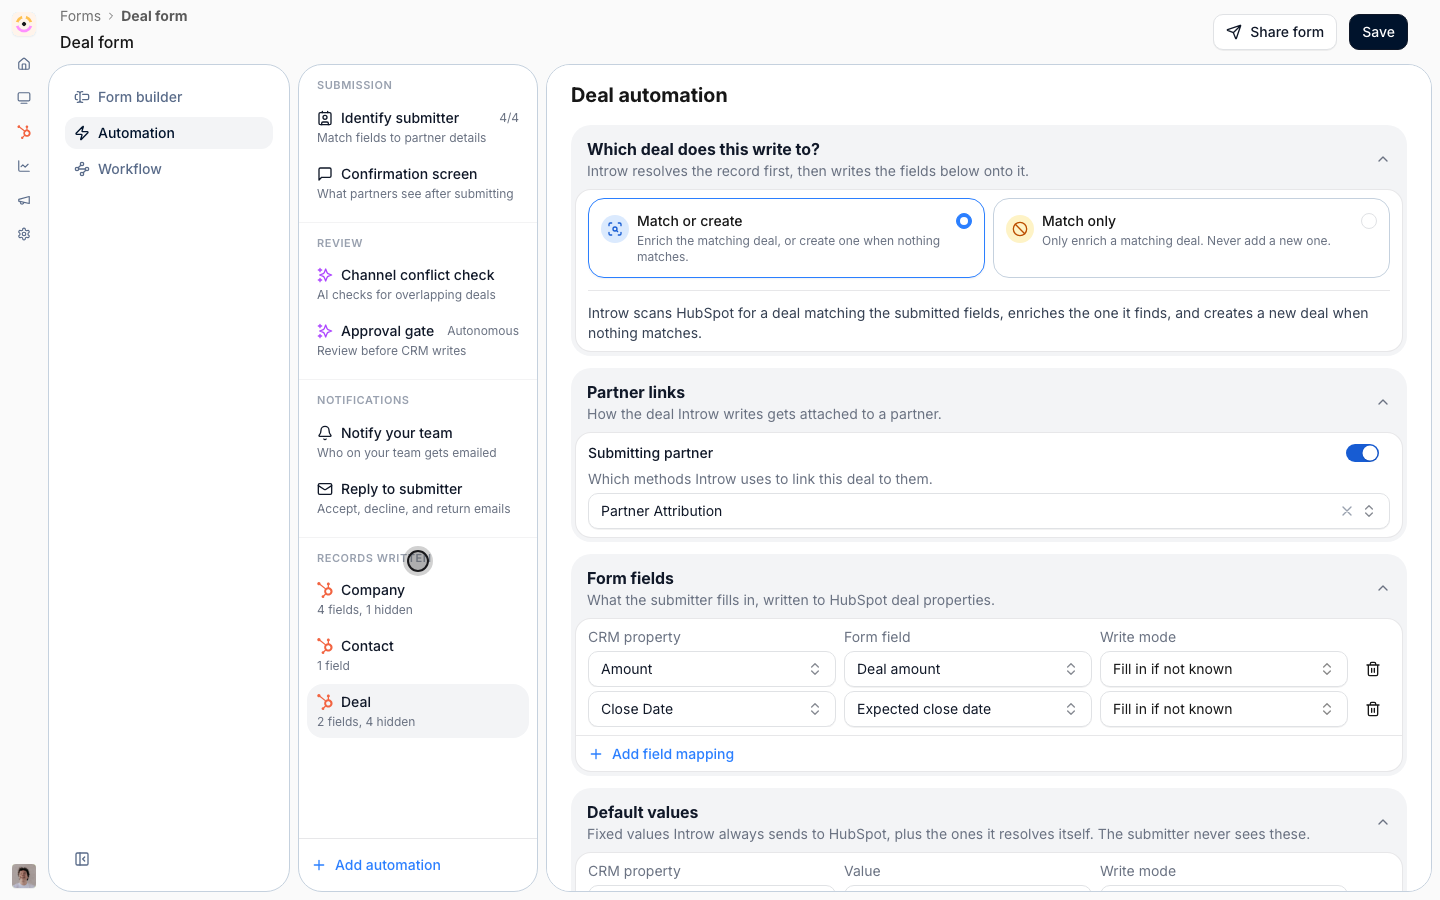
2
Choose which record it writes to
The automation opens on Which 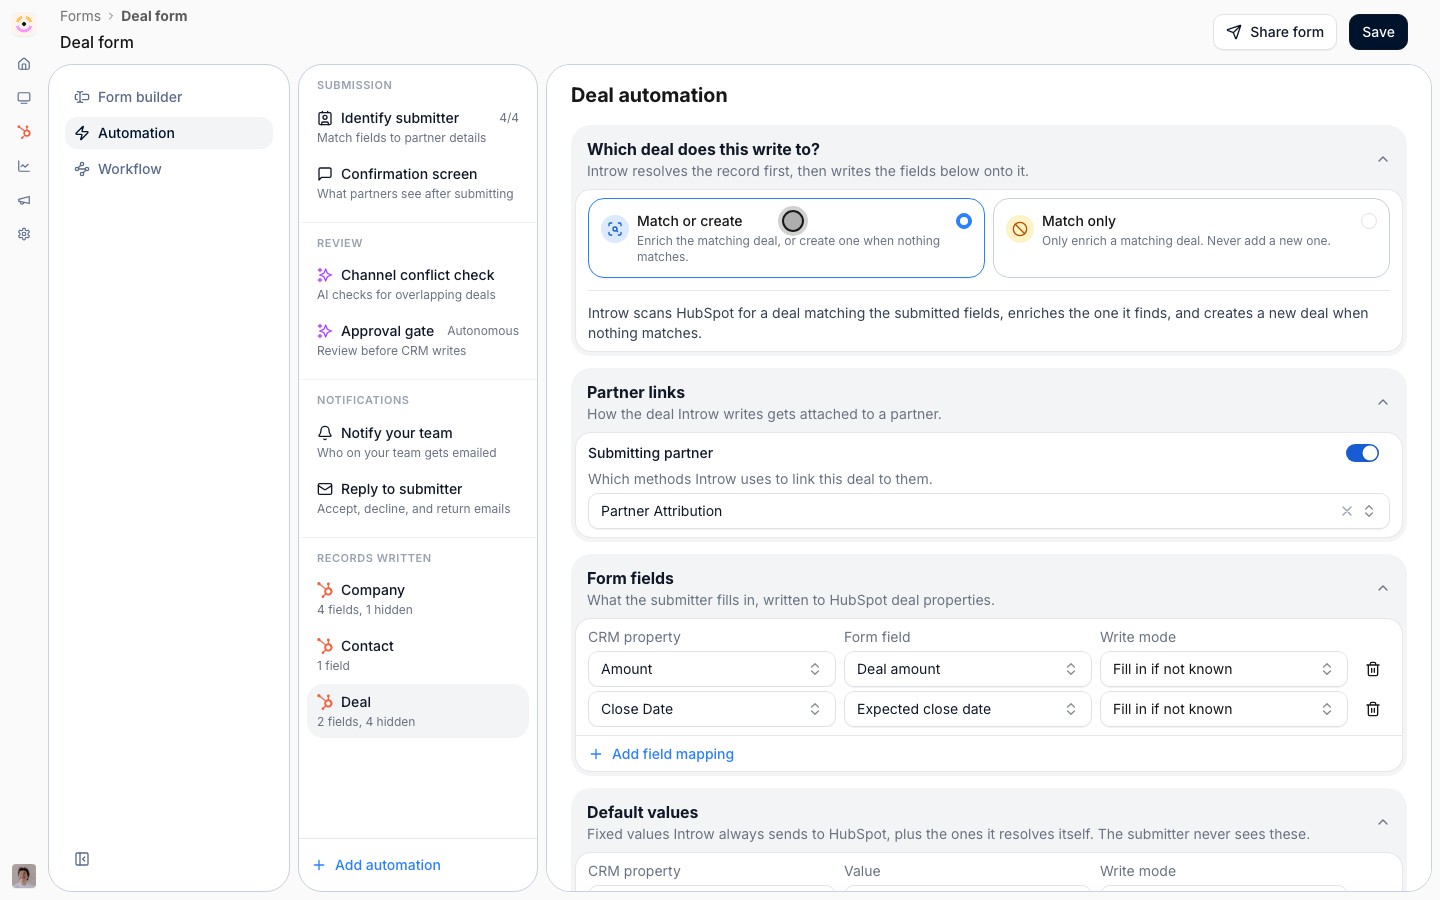
<object> does this write to?. Introw resolves the record first, then writes the fields below onto it.- Match or create (the default) - enrich the matching record, or create one when nothing matches.
- Match only - only enrich a matching record, never add a new one. Use it for a form that must never create duplicates.
- Partner’s own company or Submitter’s own contact - on company and contact automations, always write to the submitting partner’s company or the submitter’s own contact.
<object> anyway makes a fresh record instead.3
Pick the fields that identify an existing record
Under Match on these fields, choose the form fields that identify an existing record, so a submission updates the right one instead of creating a duplicate. It appears on company, contact and custom object automations. A deal automation has no picker, because a deal matches through the company and contact the same form writes. With none set, Introw uses standard matching: name plus domain or website for companies, email for contacts, and every form-mapped field for a custom object. A company is only updated on an exact domain, website or name match; a name that is merely close is flagged for review and a new company is created. A fixed value under Default values never counts as a match field, so setting one does not stop a custom object from matching. When nothing on the form can identify an existing record, the automation says so, because every submission then creates a new one, or, with Match only, writes nothing.
4
Set how each property is filled
Inside the automation, configure values in two places: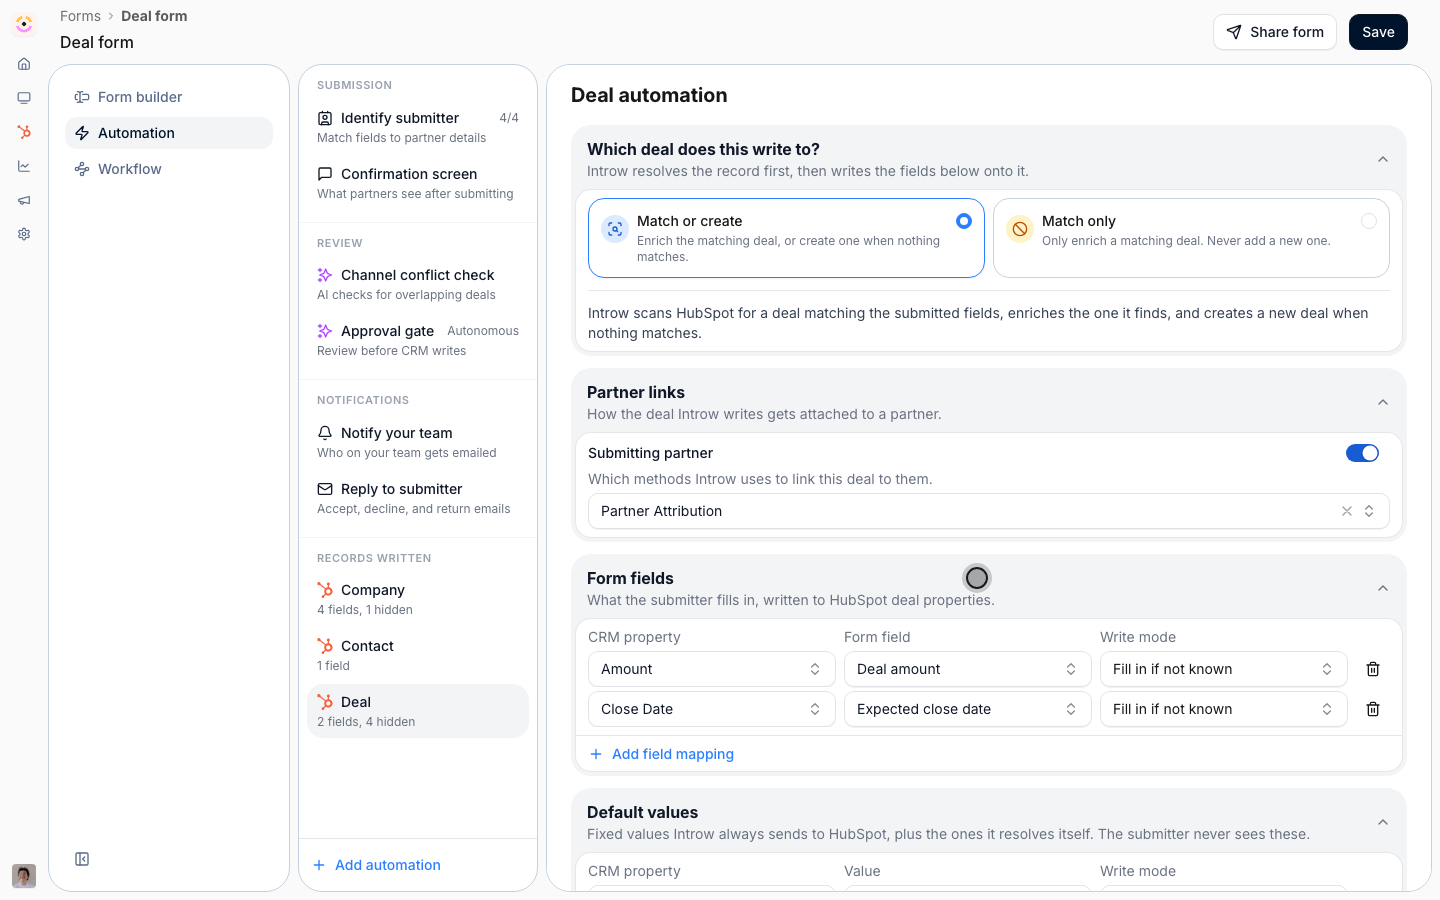 Below your own default values, locked rows show what Introw fills itself when the form is submitted, such as the link to the partner behind the submission. Hover a row to see what it points at, or map the same property yourself to override it.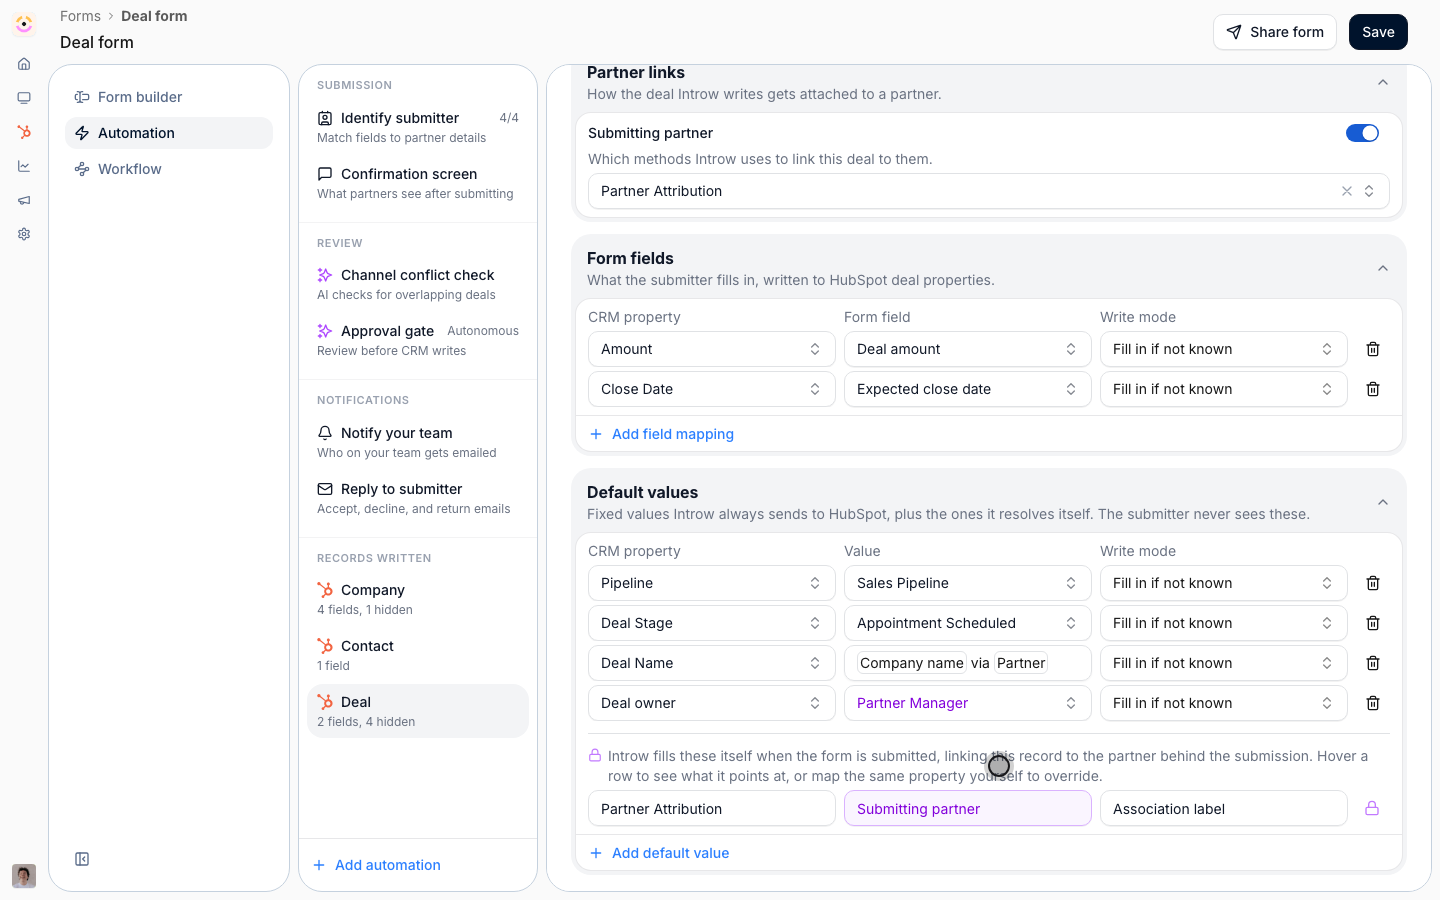
- Form fields - pair a CRM property with a Form field, so the submitted value fills it.
- Default values - set a fixed Value for a CRM property regardless of what the partner submits. Use this for constants like the pipeline, the stage, a deal-name pattern, the owner or, on Salesforce, the Record Type.
- Fill in if not known - only writes when the property is empty, so you add missing data without touching existing values. This is the safe default for updates.
- Overwrite - always replaces the current value. Use it only when the form is the authoritative source for that property.
Attribute submissions to the partner
1
Choose how the record is linked to the partner
In the automation’s Partner links block, keep Submitting partner on and pick the methods Introw uses to link the record to them, such as Partner Attribution. The methods are the ones you already defined on your CRM connection, so there is no per-form wiring. This is what keeps partner-sourced pipeline attributed in the CRM rather than landing as orphaned records.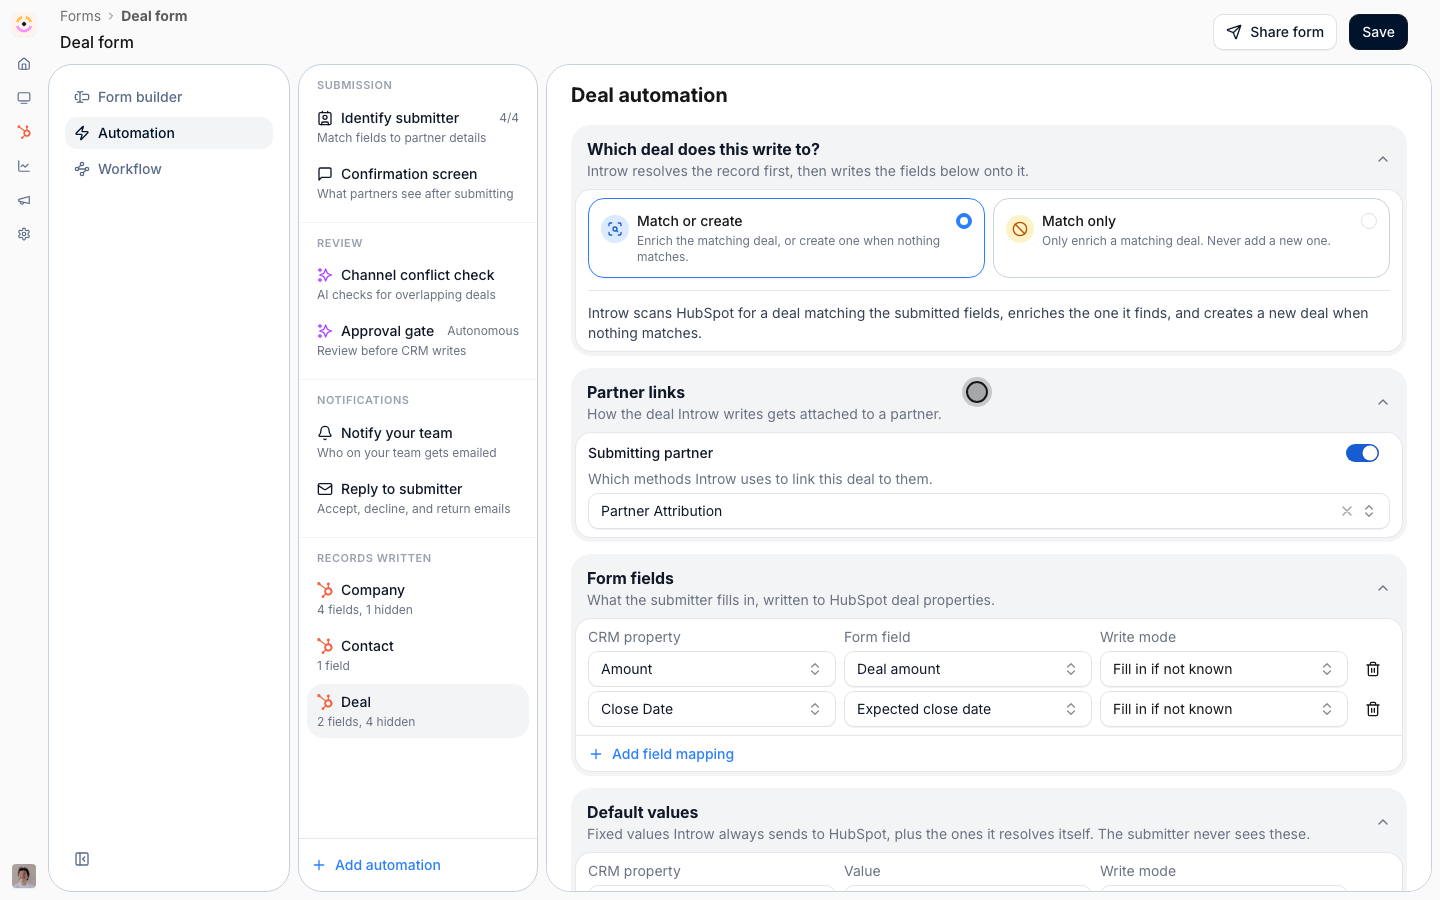
2
Make sure the form knows the partner
Share the form with a Partner link so submissions are related to that partner, or capture the partner with a partner picker field. Without a known partner, attribution has nothing to write.
Prefill from a known CRM record
1
Open the form in record context
When a form is opened with a CRM record’s context - for example from a CRM embed on that record - its mapped fields prefill with the record’s current values. Partners then confirm or correct known data instead of retyping it, which speeds up submission and keeps values consistent. Prefill relies entirely on the field mapping from the first phase, so any field you want pre-populated must be mapped to a property.
Create a partner from a submission (optional)
1
Add the Partner automation
For forms that onboard brand-new partners (a partner application, for example), choose Add automation and add Partner automation to create a partner directly from a submission. In its panel you map the Partner name and Partner domain from form fields, optionally set the new partner’s Tier, Phase, and Partner manager, choose the portal Experience and Partner portal access (Restricted to invited users or Restricted to partner domain), and optionally turn on Auto-invite submitter with a Welcome message so the submitter is invited automatically. Note that adding this automation turns off channel-conflict analysis on the form, since the submission is creating a partner rather than registering against an existing one.
CRM-specific differences
1
HubSpot: set association labels
On HubSpot, a CRM object automation has an Association labels section, so created records are linked with the right labeled association (for example which company a contact belongs to). Leave Use default association label on unless your HubSpot setup uses specific labeled associations.
2
Salesforce: map to the matching object and fields
On Salesforce, pick the Salesforce object each automation targets and map fields to the matching Salesforce fields. The create/update, write-mode, attribution, and deduplication behavior is the same; only the object and field names differ by CRM.
Verify it worked
Submit a test through a partner link. In your CRM, the expected records are created or updated with the right values, existing data is preserved where you chose fill-if-empty, no duplicate is created for a matching record, and each record is attributed to the submitting partner. Opening the form from a record’s context shows its fields prefilled.Related
Build and publish a form
Create the form and fields you map here.
Run a submission approval workflow
Review and approve submissions before they act.
Implementation reference
Full configuration options.