> ## Documentation Index
> Fetch the complete documentation index at: https://docs.introw.io/llms.txt
> Use this file to discover all available pages before exploring further.
# Enable partners with a campaign kit
> Build a campaign kit in Assets, co-brand its one-pager, and publish it on a Marketing tab in the partner portal with a hero banner and buttons.
Partners that drive revenue already have their own marketing tools.
What they lack is a finished campaign: the message, the emails, the posts and a one-pager they can put their own name on.
A campaign kit gives them exactly that, in one folder they pick up from a tab in their portal.
This guide takes you from an empty folder to a published Marketing tab with the kit, a co-branded one-pager and buttons that lead partners to the next step.
## What you'll achieve
A campaign kit folder in your asset library holding the brief, the email sequence, the social posts, a banner, a call talk track and a co-branded one-pager.
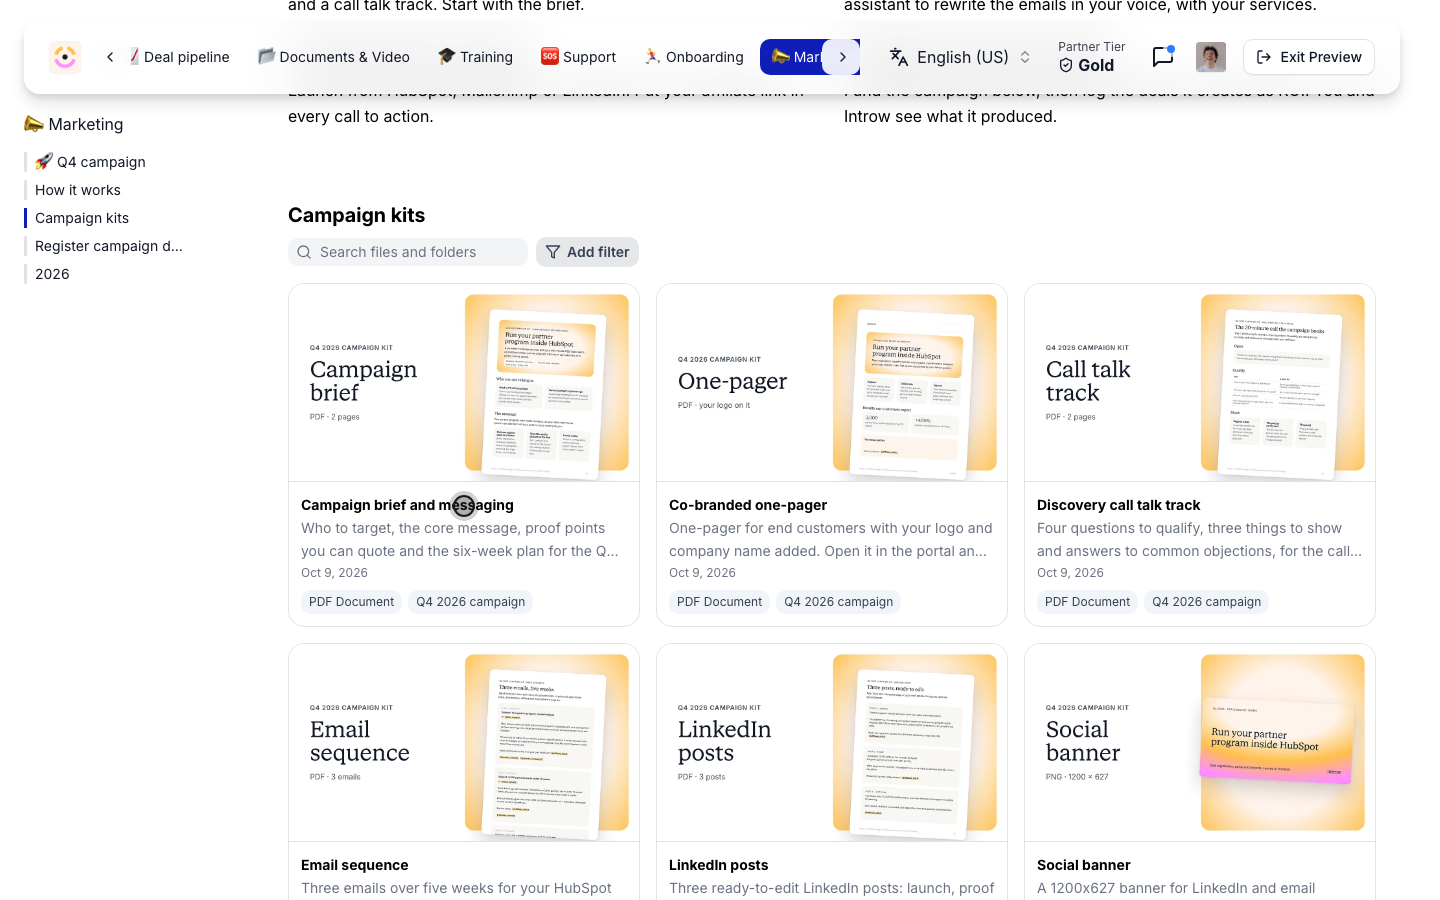
A Marketing tab in your partners' portal with a hero banner, the kit in a thumbnail hub, and buttons that open the forms you want partners to use next.
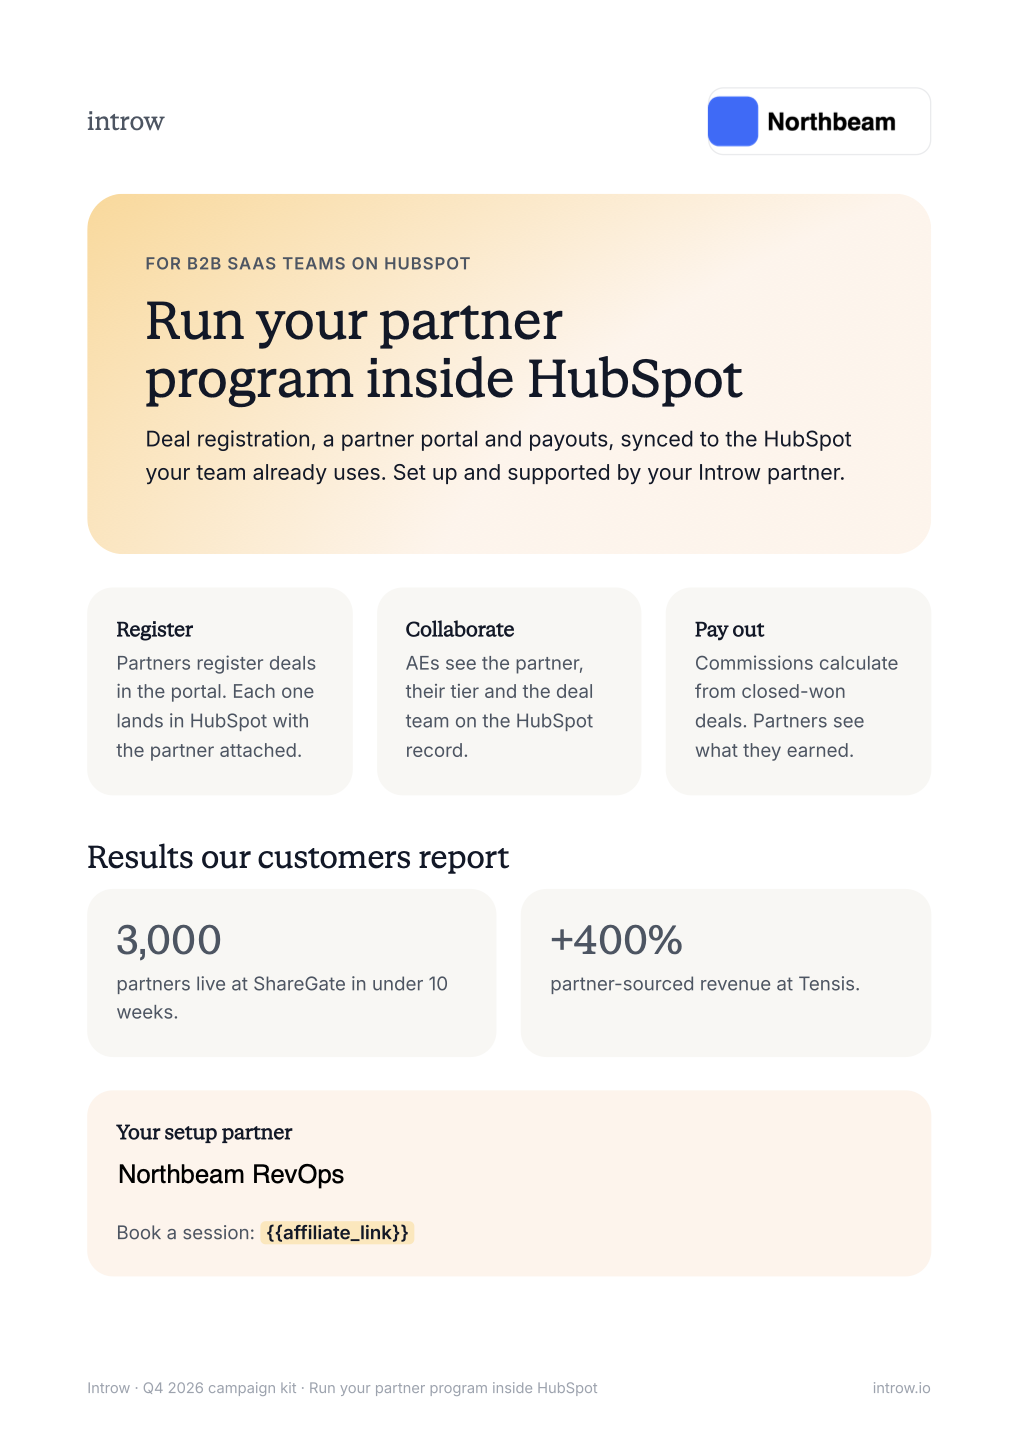
Every partner who opens the one-pager gets a copy with their own name and logo.
## Before you start
Have the brief, the emails and the posts written so a partner can send them as they are.
Use placeholders such as first name and affiliate link where the partner fills something in.
Design the one-pager in your usual tool and export it as a PDF with two form fields: one named with `partner.name` for the partner's company name, and one named with `partner.logo` where their logo goes.
Leave the logo area empty in the design, so nothing shows behind a partner's logo.
You need write access to assets and to experiences.
## Watch it
## Steps
### Build the kit in Assets
Go to [Assets](https://app.introw.io/assets/library), select **Add asset**, then **Create folder**, and name it Campaign kits.
This folder holds every campaign you run, one subfolder each.
Pointing the portal at this parent folder once means every future campaign shows up without editing the portal again.
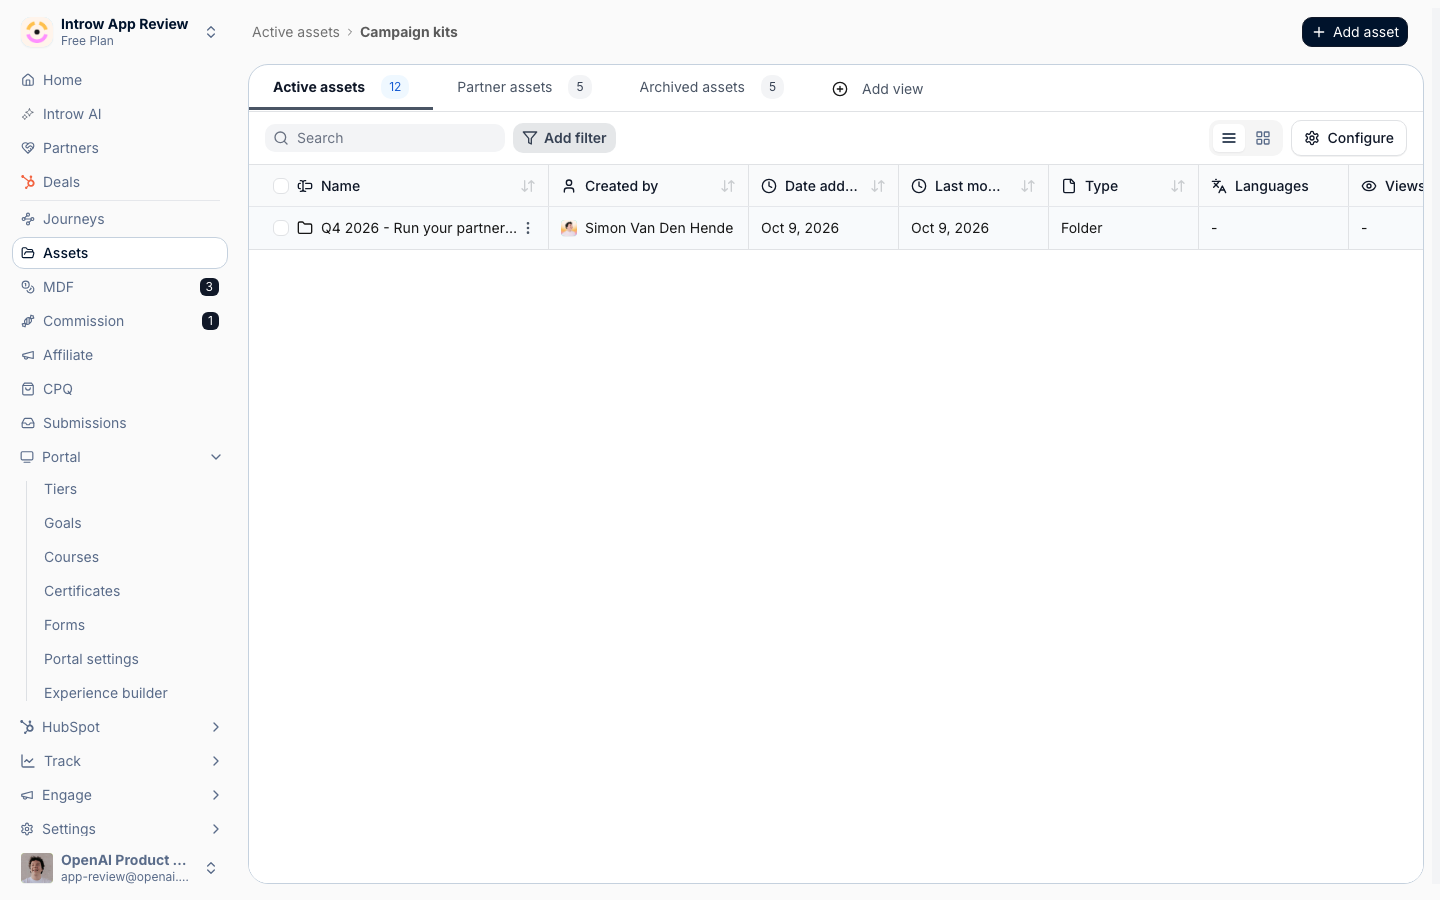 Open Campaign kits, select **Add asset**, then **Create folder**, and name the subfolder after the campaign, such as Q4 2026 - Run your partner program inside HubSpot.
Put the quarter in the name so partners can tell the current campaign from last quarter's.
Open Campaign kits, select **Add asset**, then **Create folder**, and name the subfolder after the campaign, such as Q4 2026 - Run your partner program inside HubSpot.
Put the quarter in the name so partners can tell the current campaign from last quarter's.
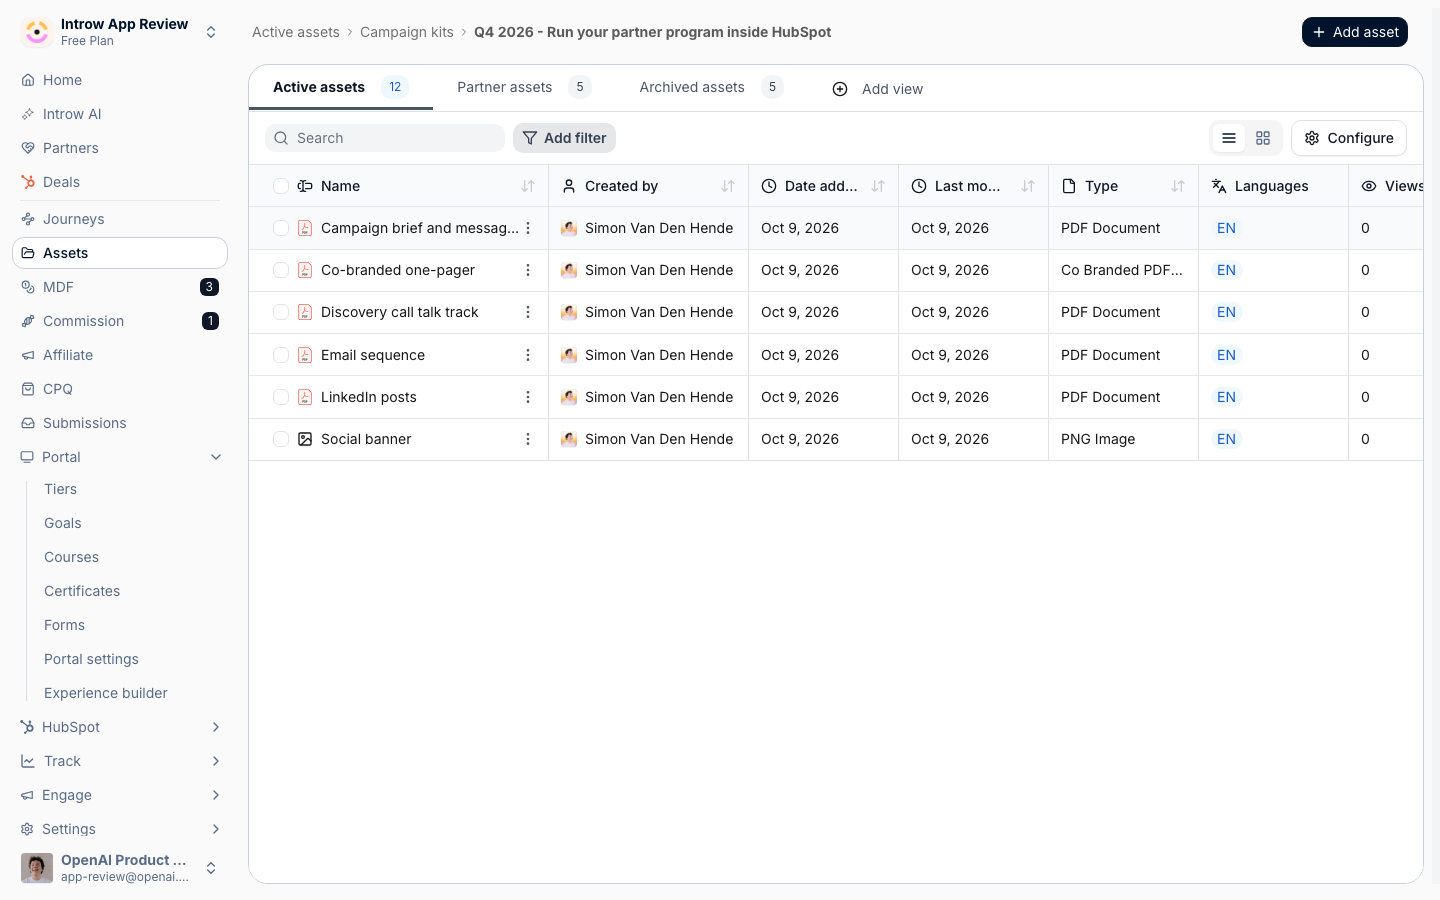 Inside the campaign folder, select **Add asset**, then **Upload**, and drop in the brief, the email sequence, the social posts and the banner.
Several files upload in one go.
When you upload a single file, Introw asks for its details first:
* **Name** - what partners see on the card. Drop the file extension: Email sequence reads better than Email sequence.pdf.
* **Type** - keep **Regular**. **Partner Specific** is for an asset tied to one partner, such as a signed agreement.
* **Categories** - optional. Add one if partners will filter a large hub by topic.
* **Language** and **Variants** - the language of the file, and translated versions of it if you have them.
Use **Web page URL** instead of **Upload** for a landing page or a hosted video.
Use **Import folder** when the whole kit already sits in a folder on your drive.
Inside the campaign folder, select **Add asset**, then **Upload**, and drop in the brief, the email sequence, the social posts and the banner.
Several files upload in one go.
When you upload a single file, Introw asks for its details first:
* **Name** - what partners see on the card. Drop the file extension: Email sequence reads better than Email sequence.pdf.
* **Type** - keep **Regular**. **Partner Specific** is for an asset tied to one partner, such as a signed agreement.
* **Categories** - optional. Add one if partners will filter a large hub by topic.
* **Language** and **Variants** - the language of the file, and translated versions of it if you have them.
Use **Web page URL** instead of **Upload** for a landing page or a hosted video.
Use **Import folder** when the whole kit already sits in a folder on your drive.
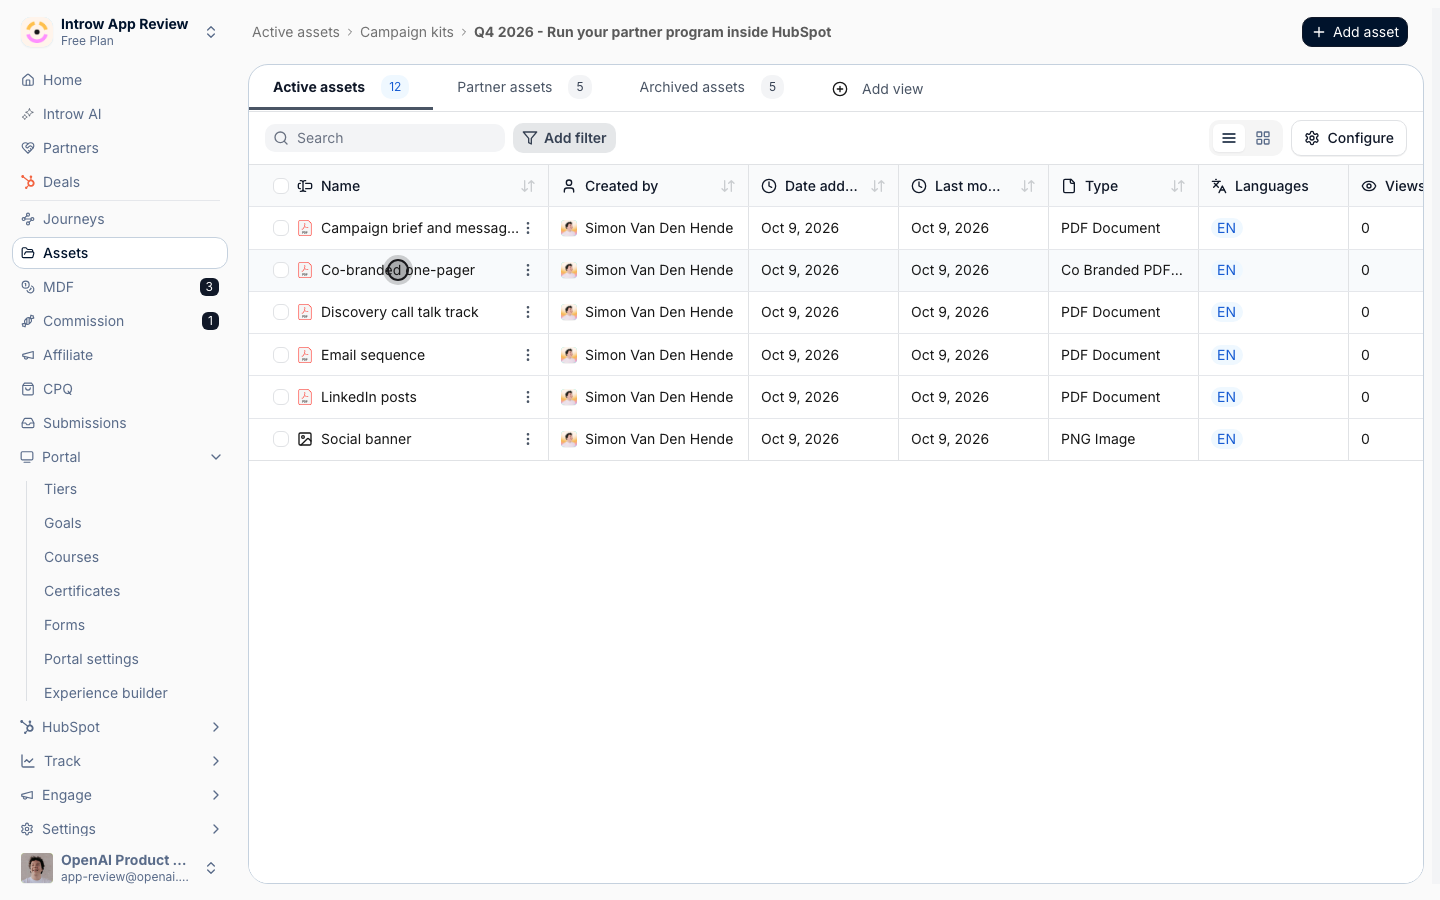 Select each asset to open its detail panel, and fill in **Add a short description** with one sentence on what it is and when to use it.
For example: Three emails over five weeks for your HubSpot client list, with placeholders for your name and affiliate link.
Partners read this on the card in the portal.
Their AI assistant reads it too when it searches your content, so a vague description is an asset nobody's assistant finds.
Hover the **Thumbnail** in the detail panel and select **Upload thumbnail** (16:9, 1200 x 675 recommended), then **Crop & save**.
Without one, Introw shows the top of each file, and a kit of PDFs and an image ends up looking like six unrelated documents.
Use one layout for the whole kit, such as the asset's name on the left and its first page on the right, so partners see one campaign at a glance.
On the **Access** tab of the detail panel, each asset has one of three settings:
* **Portal access** - every partner user with portal access can see it. This is the default and the right choice for most kits.
* **Restricted access** - only partners in the segments you pick can see it. Use it for a campaign reserved for one tier.
* **Public access** - anyone with the link can view it, partner or not.
### Co-brand the one-pager
Upload the fillable PDF into the campaign folder and name it Co-branded one-pager.
Introw reads its form fields on upload.
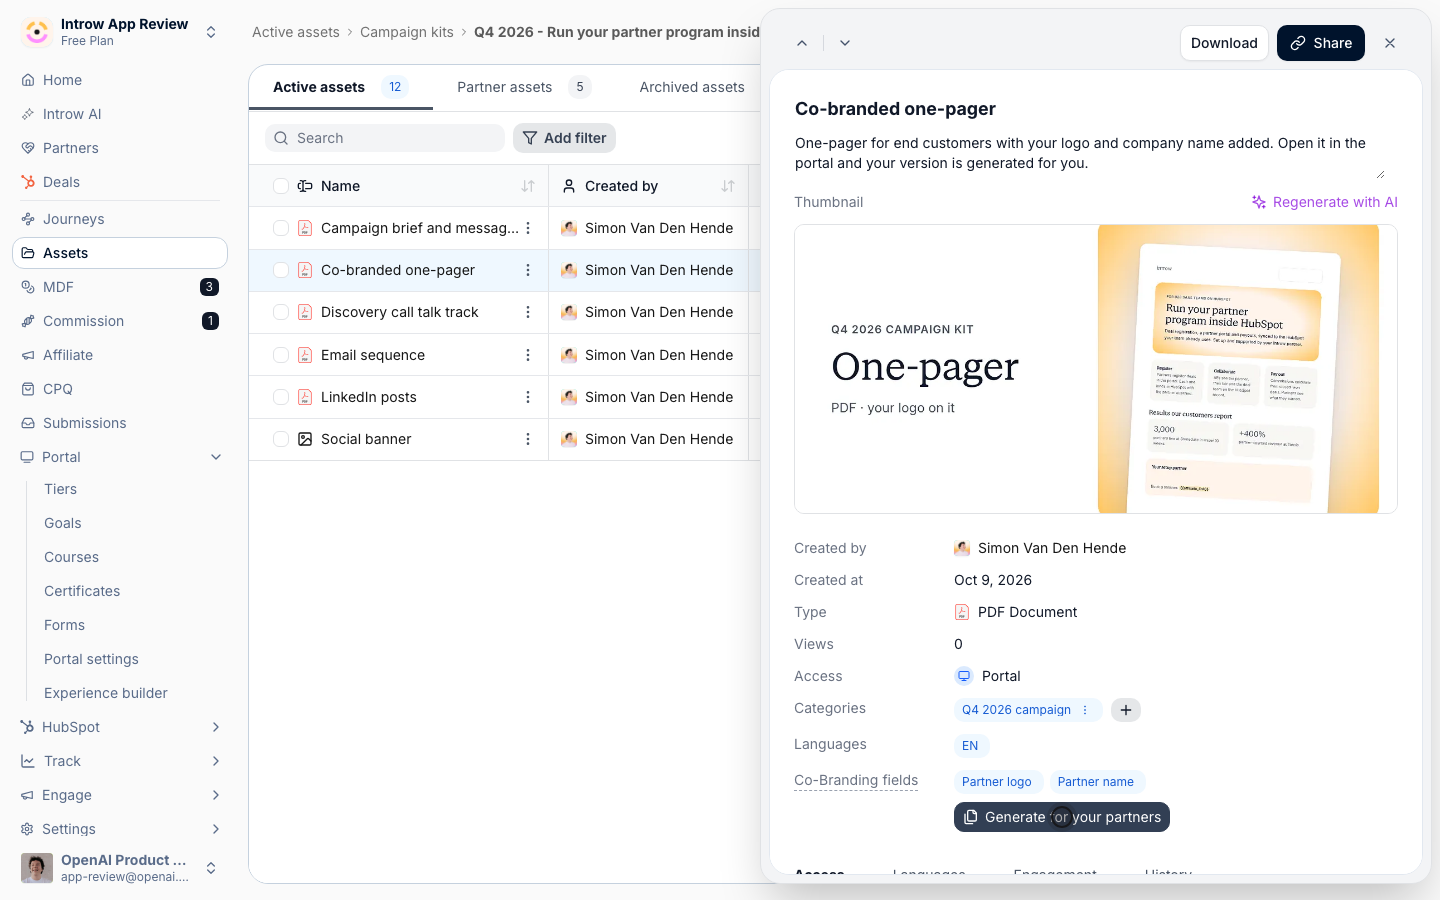
The detail panel then shows **Co-Branding fields** with **Partner name** and **Partner logo**.
If it shows neither, the field names do not contain partner name or partner logo; rename them in your PDF editor and replace the asset.
Select **Generate for your partners**.
In **Generate co-branded assets**, keep **All Partners** or pick specific partners, and select **Generate**.
Each copy appears on the **Partner assets** tab of Assets, named after the template and the partner, for example Co-branded one-pager \<> Apple.
Open one to check the logo sits where you expect.
A partner who opens the template in the portal later gets their copy generated on the spot, so generating up front is optional.
Select each asset to open its detail panel, and fill in **Add a short description** with one sentence on what it is and when to use it.
For example: Three emails over five weeks for your HubSpot client list, with placeholders for your name and affiliate link.
Partners read this on the card in the portal.
Their AI assistant reads it too when it searches your content, so a vague description is an asset nobody's assistant finds.
Hover the **Thumbnail** in the detail panel and select **Upload thumbnail** (16:9, 1200 x 675 recommended), then **Crop & save**.
Without one, Introw shows the top of each file, and a kit of PDFs and an image ends up looking like six unrelated documents.
Use one layout for the whole kit, such as the asset's name on the left and its first page on the right, so partners see one campaign at a glance.
On the **Access** tab of the detail panel, each asset has one of three settings:
* **Portal access** - every partner user with portal access can see it. This is the default and the right choice for most kits.
* **Restricted access** - only partners in the segments you pick can see it. Use it for a campaign reserved for one tier.
* **Public access** - anyone with the link can view it, partner or not.
### Co-brand the one-pager
Upload the fillable PDF into the campaign folder and name it Co-branded one-pager.
Introw reads its form fields on upload.
The detail panel then shows **Co-Branding fields** with **Partner name** and **Partner logo**.
If it shows neither, the field names do not contain partner name or partner logo; rename them in your PDF editor and replace the asset.
Select **Generate for your partners**.
In **Generate co-branded assets**, keep **All Partners** or pick specific partners, and select **Generate**.
Each copy appears on the **Partner assets** tab of Assets, named after the template and the partner, for example Co-branded one-pager \<> Apple.
Open one to check the logo sits where you expect.
A partner who opens the template in the portal later gets their copy generated on the spot, so generating up front is optional.
 If you replace the template, generate again: the new copies sit next to the earlier ones rather than replacing them.
Archive the older copies on the **Partner assets** tab so each partner keeps one current version.
### Put the kit in the portal
Go to the [Experience builder](https://app.introw.io/templates), open the experience your partners use, select **Add** in the tab bar, and name the tab, such as 📣 Marketing.
One Marketing tab for every campaign keeps the rest of the portal unchanged when a campaign ends.
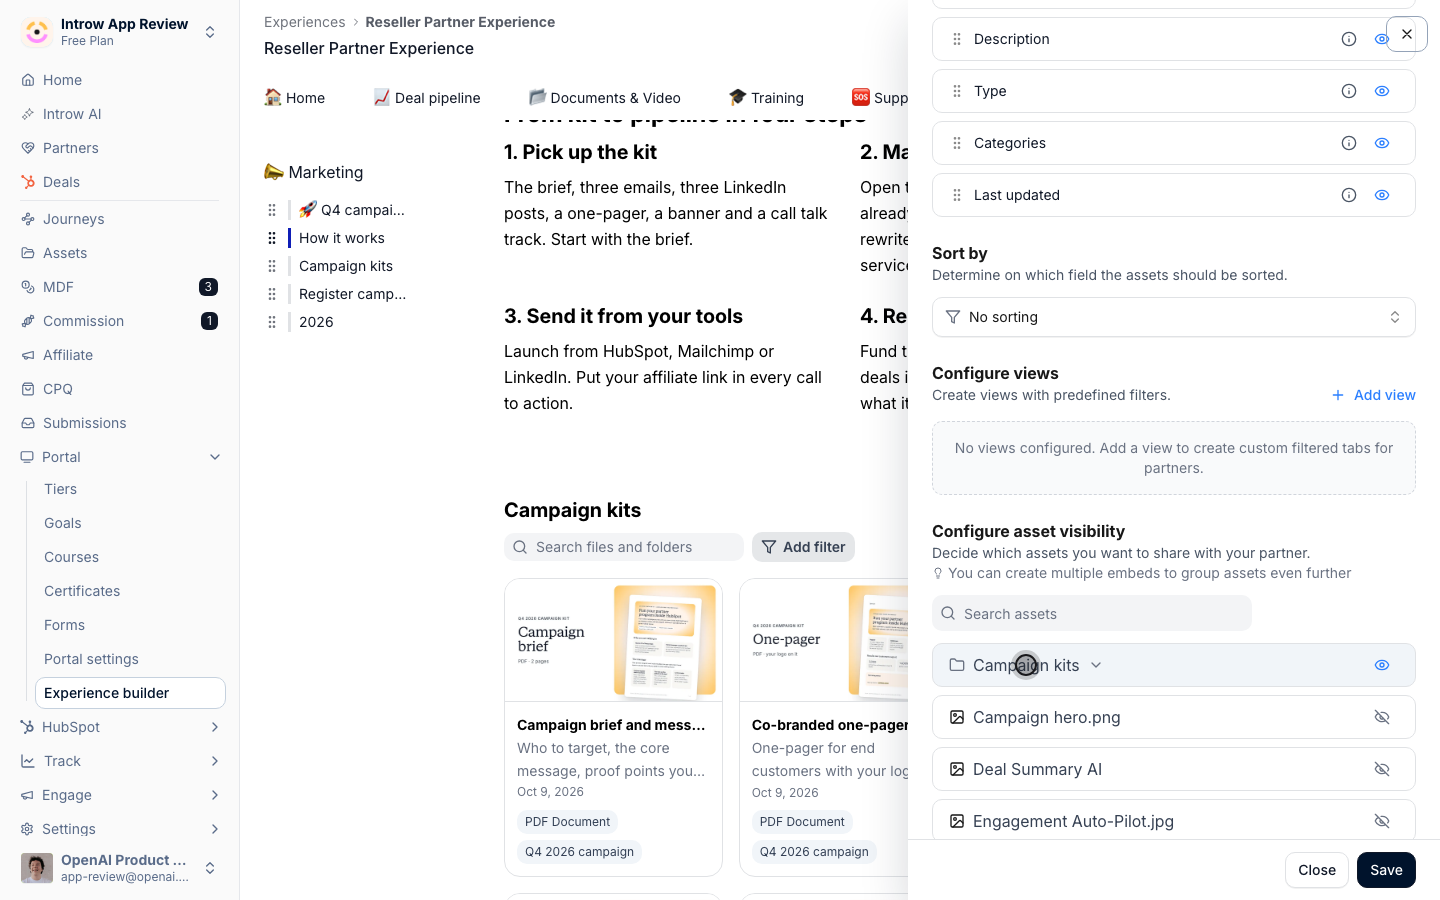
In the section picker, choose **Smart sections**, then **Asset hub**, then **General Asset Hub**.
The configuration sheet opens on the right:
* **Configure layout** - choose **Thumbnails**. Partners recognize a document by its first page.
* **Show search bar** and **Show filters** - leave both on once you run more than one campaign.
* **Configure properties** - turn on **Description**, so the sentence you wrote shows on each card.
* **Configure asset visibility** - turn on the eye next to the Campaign kits folder.
Select **Save**.
Until a folder's eye is on, the hub shows **Start your configuration** and partners see an empty tab.
The hub takes what is in the folder at the moment you switch the eye on.
When you add an asset to the kit later, open **Configure** again and switch the folder off and back on, or the new asset stays out of the hub.
Give the section a title, such as Campaign kits, by editing the heading above the hub.
If you replace the template, generate again: the new copies sit next to the earlier ones rather than replacing them.
Archive the older copies on the **Partner assets** tab so each partner keeps one current version.
### Put the kit in the portal
Go to the [Experience builder](https://app.introw.io/templates), open the experience your partners use, select **Add** in the tab bar, and name the tab, such as 📣 Marketing.
One Marketing tab for every campaign keeps the rest of the portal unchanged when a campaign ends.
In the section picker, choose **Smart sections**, then **Asset hub**, then **General Asset Hub**.
The configuration sheet opens on the right:
* **Configure layout** - choose **Thumbnails**. Partners recognize a document by its first page.
* **Show search bar** and **Show filters** - leave both on once you run more than one campaign.
* **Configure properties** - turn on **Description**, so the sentence you wrote shows on each card.
* **Configure asset visibility** - turn on the eye next to the Campaign kits folder.
Select **Save**.
Until a folder's eye is on, the hub shows **Start your configuration** and partners see an empty tab.
The hub takes what is in the folder at the moment you switch the eye on.
When you add an asset to the kit later, open **Configure** again and switch the folder off and back on, or the new asset stays out of the hub.
Give the section a title, such as Campaign kits, by editing the heading above the hub.
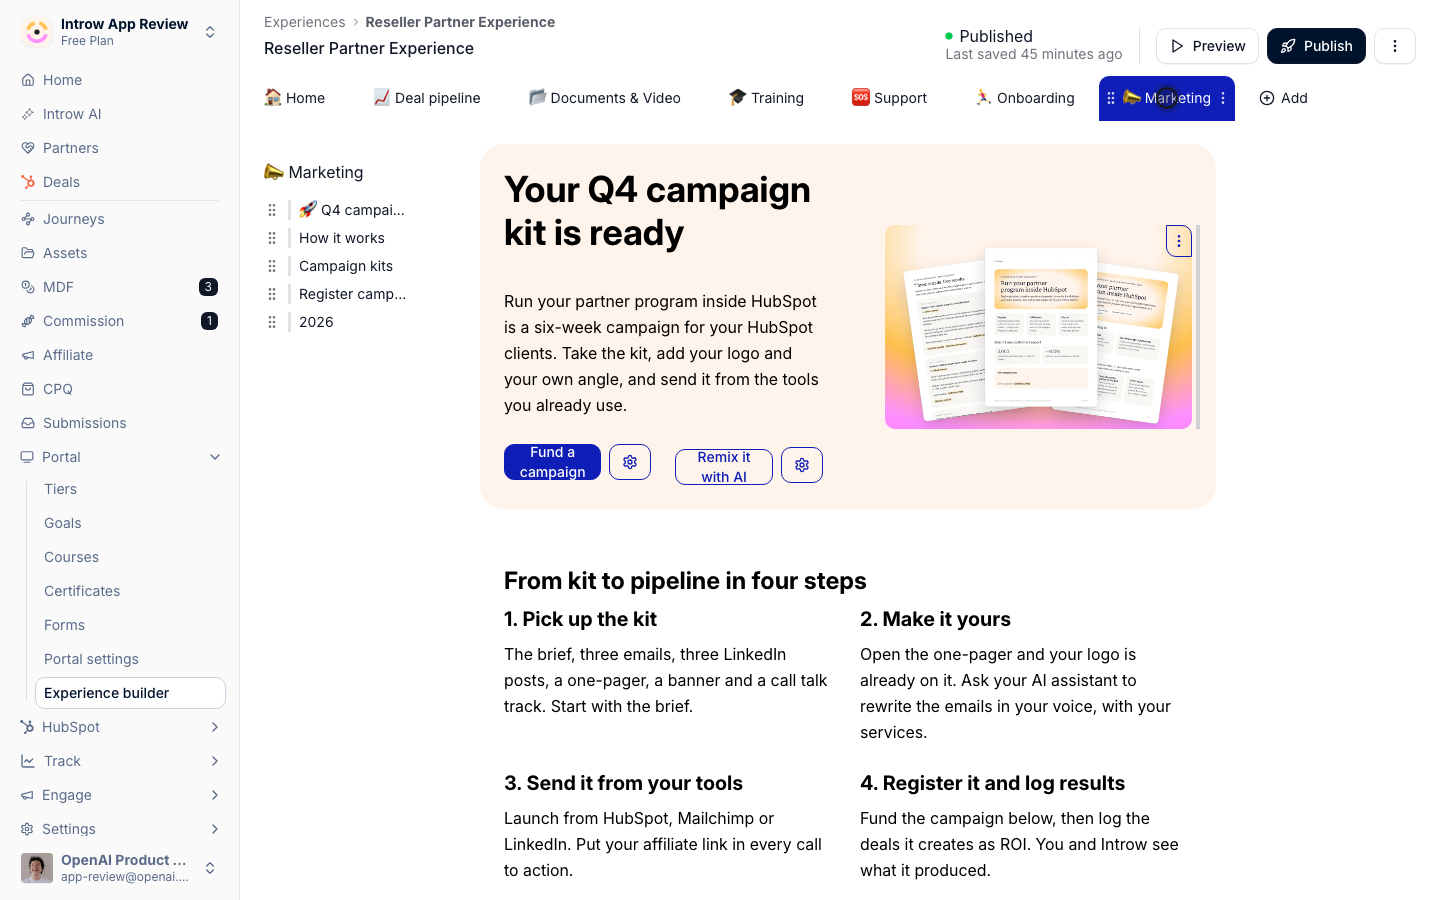
 Open the section picker again, choose **Rich sections**, then **Hero Section**, and move it above the hub.
Write the campaign headline and two sentences on what the partner does with the kit.
The heading can greet the partner by first name.
Set the image on the right to a visual of the kit.
Select the settings icon next to each button to open **Configure Call to Action**:
* **When clicked** - **Open form** opens one of your forms, **Open link** opens a URL, **Go to tab** jumps to another tab or section, and **Watch asset** plays an asset.
* **Select form**, **Link**, **Select tab** or **Select Asset** - the target, depending on what you picked above.
* **Button Text** and **Button Style** - the label, and **Primary**, **Secondary** or **Link**.
Point the **Primary** button at your request for marketing funds with **Open form**, and the **Secondary** one at the kit itself with **Go to tab**, or at a landing page with **Open link**.
Open the section picker again, choose **Rich sections**, then **Hero Section**, and move it above the hub.
Write the campaign headline and two sentences on what the partner does with the kit.
The heading can greet the partner by first name.
Set the image on the right to a visual of the kit.
Select the settings icon next to each button to open **Configure Call to Action**:
* **When clicked** - **Open form** opens one of your forms, **Open link** opens a URL, **Go to tab** jumps to another tab or section, and **Watch asset** plays an asset.
* **Select form**, **Link**, **Select tab** or **Select Asset** - the target, depending on what you picked above.
* **Button Text** and **Button Style** - the label, and **Primary**, **Secondary** or **Link**.
Point the **Primary** button at your request for marketing funds with **Open form**, and the **Secondary** one at the kit itself with **Go to tab**, or at a landing page with **Open link**.
 Add a **Banner** or a **Call to action button** below the hub that opens your deal registration form, so a reply from the campaign turns into a registered deal in one click.
If the campaign is funded, add the **Marketing Funds** section for your fund under it.
Select **Publish**.
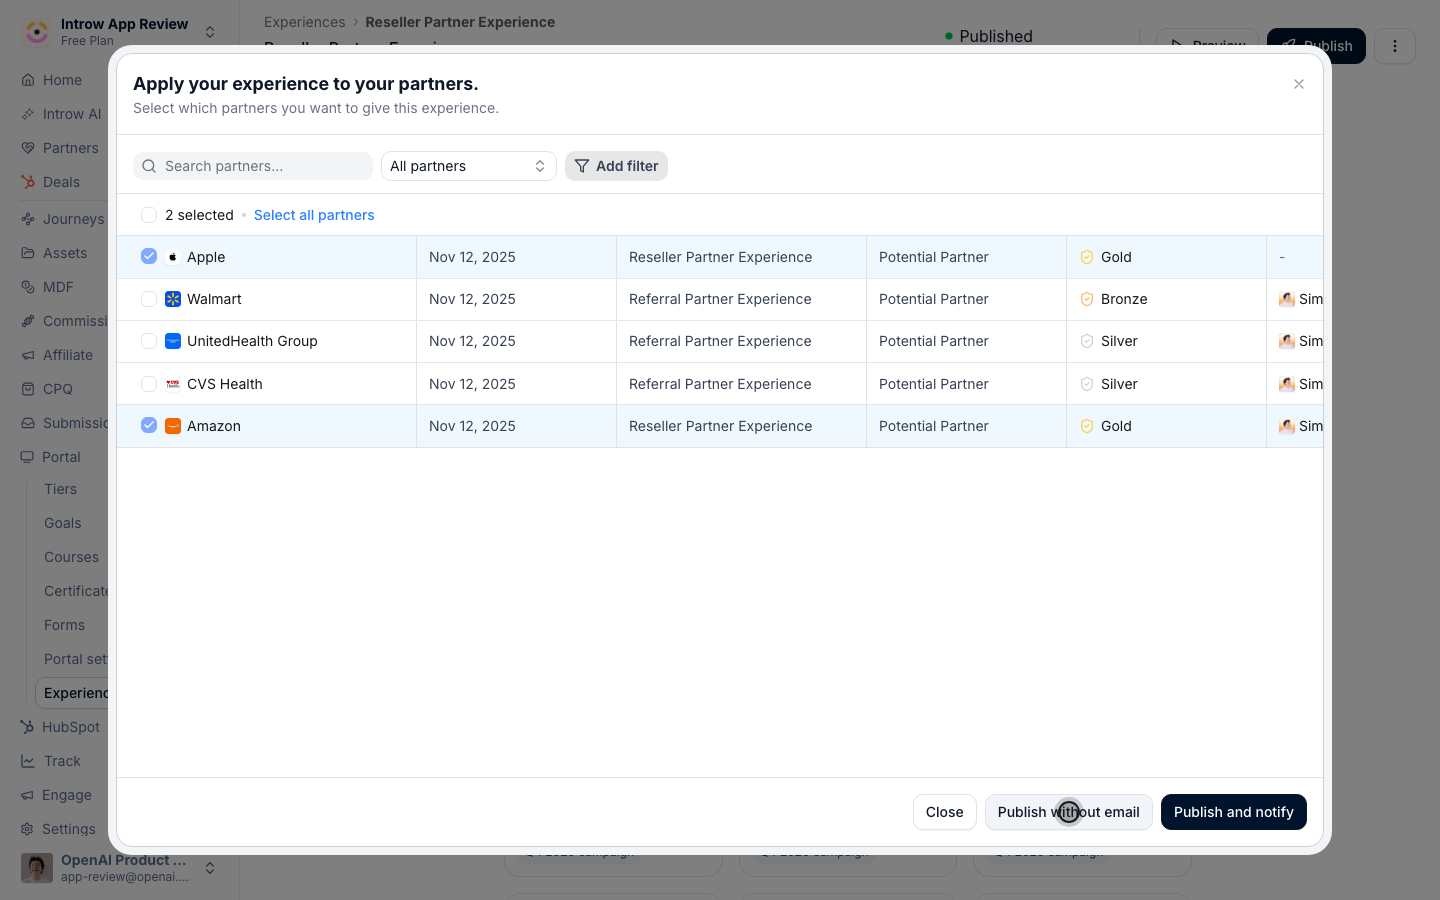
In **Apply your experience to your partners**, check the partners who should get the tab, then choose **Publish without email** to update their portal quietly, or **Publish and notify** to email them about it.
Add a **Banner** or a **Call to action button** below the hub that opens your deal registration form, so a reply from the campaign turns into a registered deal in one click.
If the campaign is funded, add the **Marketing Funds** section for your fund under it.
Select **Publish**.
In **Apply your experience to your partners**, check the partners who should get the tab, then choose **Publish without email** to update their portal quietly, or **Publish and notify** to email them about it.
 ## Verify it worked
Open a partner's portal from their partner page and go to the Marketing tab.
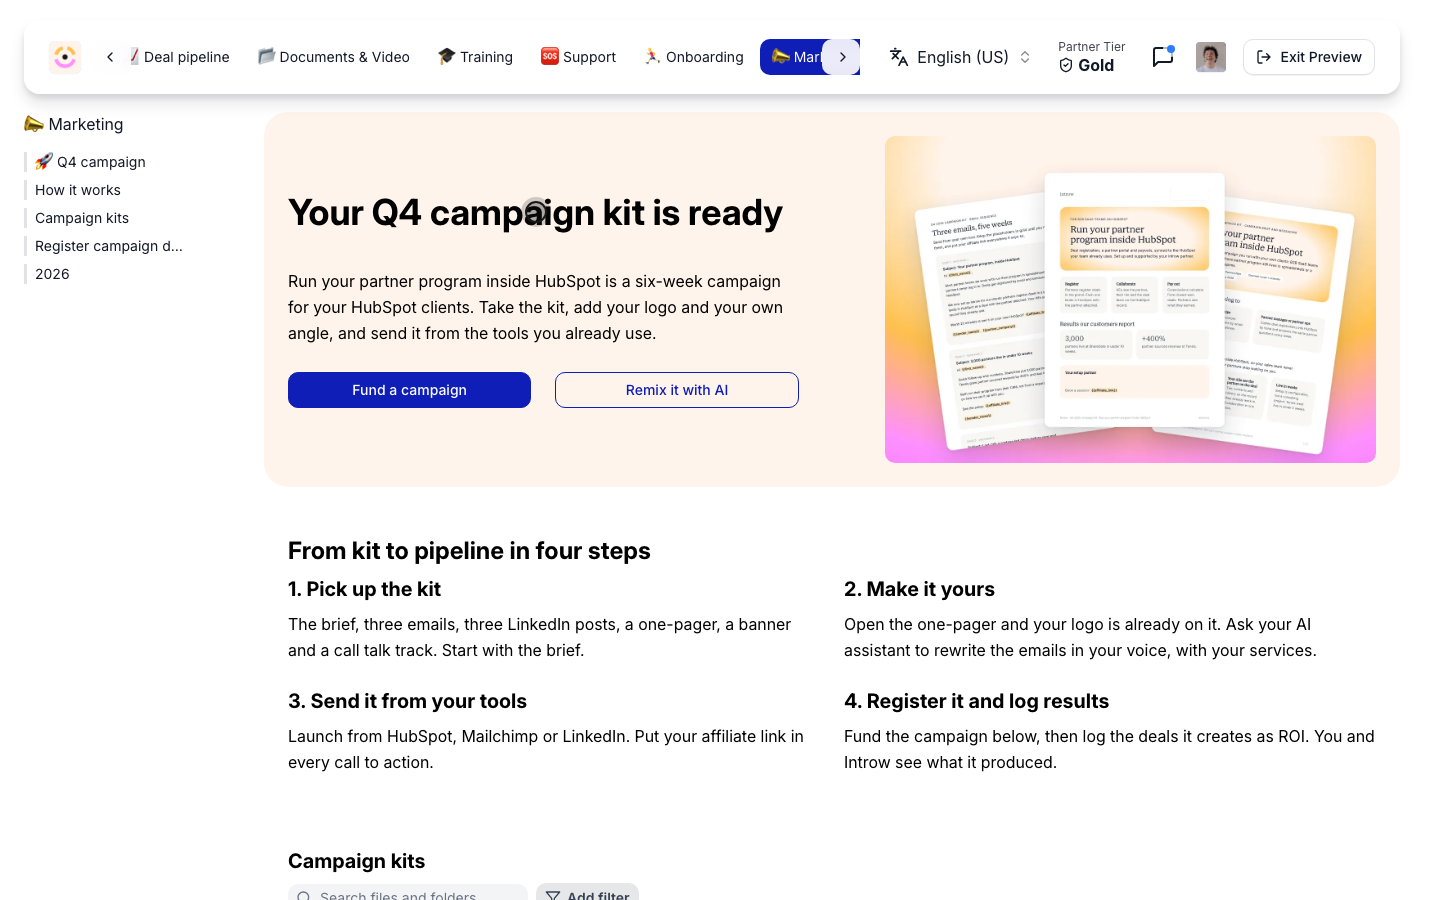
The hero banner shows the campaign and its two buttons, and the hub shows every asset in the kit with its thumbnail and description.
Open the co-branded one-pager: it carries the partner's company name and logo.
Back in Assets, the one-pager's **Engagement** tab lists the partner under **Partners**.
## Verify it worked
Open a partner's portal from their partner page and go to the Marketing tab.
The hero banner shows the campaign and its two buttons, and the hub shows every asset in the kit with its thumbnail and description.
Open the co-branded one-pager: it carries the partner's company name and logo.
Back in Assets, the one-pager's **Engagement** tab lists the partner under **Partners**.
 ## What your partners experience
Partners open the Marketing tab and find a finished campaign.
They download the brief and the emails, open the one-pager with their own logo already on it, and send everything from HubSpot, Mailchimp or LinkedIn.
Their AI assistant can find the same assets through Introw, using the descriptions you wrote.
## What your partners experience
Partners open the Marketing tab and find a finished campaign.
They download the brief and the emails, open the one-pager with their own logo already on it, and send everything from HubSpot, Mailchimp or LinkedIn.
Their AI assistant can find the same assets through Introw, using the descriptions you wrote.
 ## Related
Announce the kit, target it by segment, and watch the first week.
More on co-branded templates.
Every hub setting in detail.
Settings and troubleshooting.
This documentation is built and hosted on [Mintlify](https://mintlify.com), a developer documentation platform.
## Related
Announce the kit, target it by segment, and watch the first week.
More on co-branded templates.
Every hub setting in detail.
Settings and troubleshooting.
This documentation is built and hosted on [Mintlify](https://mintlify.com), a developer documentation platform.