> ## Documentation Index
> Fetch the complete documentation index at: https://docs.introw.io/llms.txt
> Use this file to discover all available pages before exploring further.
# Provision your team with SCIM
> Connect your identity provider to Introw over SCIM to automatically create, update, and deactivate internal team members and their access.
SCIM lets your identity provider be the single place you manage who is on your Introw team. Once connected, assigning someone to Introw in your identity provider creates their team member, and unassigning or offboarding them deactivates it and ends their sessions. That removes the manual invite step and, more importantly, closes the security gap where a leaver keeps access because someone forgot to remove them.
## What you'll achieve
Your identity provider (Okta, Microsoft Entra ID, or any SCIM 2.0 provider) provisions your internal Introw team automatically: new hires assigned to Introw appear as team members with a default role, profile changes flow through, and deactivated users lose access and have their sessions revoked, all without anyone inviting or removing people by hand.
## Before you start
Single sign-on is a paid add-on and must be enabled on your plan; SCIM is part of it. You need single sign-on permission on your role. SCIM works whether or not you also switch your team to SSO sign-in.
You need to be able to add and configure a provisioning application in your identity provider (for example an Okta or Microsoft Entra ID admin).
New team members provisioned over SCIM arrive with the org's default role. Set or confirm it in the **Default role** field of the internal SSO attribute mapping before you turn provisioning on.
## Steps
### Enable SCIM in Introw
Go to [Internal SSO](https://app.introw.io/settings/developers/sso) and scroll to the **SCIM provisioning** section. It sits on the same page as internal single sign-on, but runs independently: you do not have to switch your team to SSO sign-in to use it.
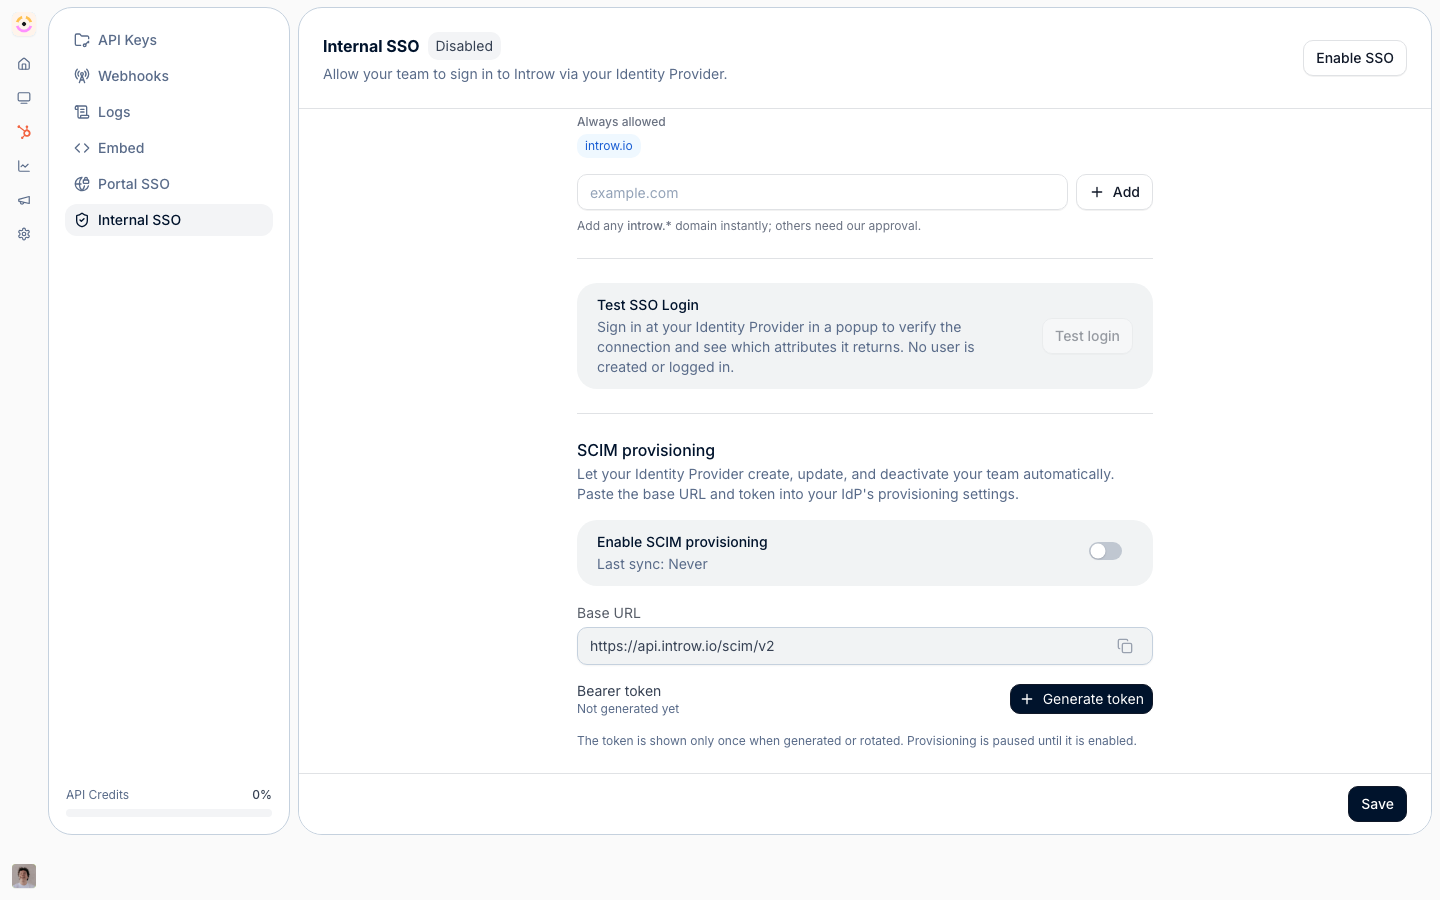 Turn on **Enable SCIM provisioning**, then select **Generate token**. The **Copy your SCIM token** dialog appears with the two values your identity provider needs:
* **Base URL** - the SCIM endpoint your identity provider connects to. Copy it from the **Base URL** field.
* **Bearer token** - the credential your identity provider authenticates with. It is shown once, so copy it now: the dialog reminds you that **This token is shown once**. Treat it like a password, and never paste it into a support chat or commit it to code.
Provisioning stays paused until it is enabled, so nothing syncs until you finish the identity-provider side.
### Connect your identity provider
In your identity provider's provisioning settings, create or open the Introw application and enable SCIM provisioning. Paste the **Base URL** as the SCIM connector base URL and the **Bearer token** as the authentication token. Enable the create, update, and deactivate user operations. Group and role push are not used: roles are assigned in Introw, not by the identity provider.
Assign the users (or the groups) in your identity provider that should have an Introw team seat. Each assigned user is provisioned as a team member with the org's **Default role**. You can change any person's role afterward on the **Roles** tab under **Settings, Team**; the identity provider cannot set or override roles, so Introw stays in control of what each person can do.
### Verify and maintain
Open the **Users** tab under **Settings, Team** and confirm the assigned people now appear as team members in the default role. Back in the **SCIM provisioning** section, **Last sync** updates to a recent time once your identity provider has pushed.
Unassign or deactivate a test user in your identity provider. Their team member moves to deactivated in Introw and their active sessions are revoked, so access ends without a manual step. This is the offboarding guarantee SCIM exists for.
If the token is exposed or you are rotating credentials, use **Rotate** to issue a new token and immediately invalidate the old one, then update your identity provider with the new value to keep provisioning working. Use **Revoke** to remove the connection entirely; after that your identity provider can no longer provision or deactivate users until you generate a new token.
## Verify it worked
A user you assign to Introw in your identity provider appears on the **Users** tab within a sync, in the default role, with no invitation sent. **Last sync** in the **SCIM provisioning** section shows a recent time. When you deactivate that user in the identity provider, their team member becomes deactivated in Introw and they can no longer sign in.
## Related
Add single sign-on alongside SCIM so your team also signs in through your identity provider.
Build the role that provisioned users land in, or reassign them after they arrive.
How partners, contacts, and your team all get into Introw.
Full configuration options.
Turn on **Enable SCIM provisioning**, then select **Generate token**. The **Copy your SCIM token** dialog appears with the two values your identity provider needs:
* **Base URL** - the SCIM endpoint your identity provider connects to. Copy it from the **Base URL** field.
* **Bearer token** - the credential your identity provider authenticates with. It is shown once, so copy it now: the dialog reminds you that **This token is shown once**. Treat it like a password, and never paste it into a support chat or commit it to code.
Provisioning stays paused until it is enabled, so nothing syncs until you finish the identity-provider side.
### Connect your identity provider
In your identity provider's provisioning settings, create or open the Introw application and enable SCIM provisioning. Paste the **Base URL** as the SCIM connector base URL and the **Bearer token** as the authentication token. Enable the create, update, and deactivate user operations. Group and role push are not used: roles are assigned in Introw, not by the identity provider.
Assign the users (or the groups) in your identity provider that should have an Introw team seat. Each assigned user is provisioned as a team member with the org's **Default role**. You can change any person's role afterward on the **Roles** tab under **Settings, Team**; the identity provider cannot set or override roles, so Introw stays in control of what each person can do.
### Verify and maintain
Open the **Users** tab under **Settings, Team** and confirm the assigned people now appear as team members in the default role. Back in the **SCIM provisioning** section, **Last sync** updates to a recent time once your identity provider has pushed.
Unassign or deactivate a test user in your identity provider. Their team member moves to deactivated in Introw and their active sessions are revoked, so access ends without a manual step. This is the offboarding guarantee SCIM exists for.
If the token is exposed or you are rotating credentials, use **Rotate** to issue a new token and immediately invalidate the old one, then update your identity provider with the new value to keep provisioning working. Use **Revoke** to remove the connection entirely; after that your identity provider can no longer provision or deactivate users until you generate a new token.
## Verify it worked
A user you assign to Introw in your identity provider appears on the **Users** tab within a sync, in the default role, with no invitation sent. **Last sync** in the **SCIM provisioning** section shows a recent time. When you deactivate that user in the identity provider, their team member becomes deactivated in Introw and they can no longer sign in.
## Related
Add single sign-on alongside SCIM so your team also signs in through your identity provider.
Build the role that provisioned users land in, or reassign them after they arrive.
How partners, contacts, and your team all get into Introw.
Full configuration options.